Archive for the ‘Canopy’ Category

Windscreen fairing trimming

Saturday, May 1st, 2021

Now that I have all three pieces of the windscreen fairing more or less fitted to the airplane, the next step is to trim the remaining edges to their final dimension. The curve around the base of the windscreen was always going to be the hardest, since it's a compound shape that resists the use of traditional layout tools. I wanted this to look really good, since it will be one of the first things you notice when you walk up to the airplane, so I didn't want to just freehand it – I had to use some kind of edge to mark the cut line. The last few inches at the rear can be marked with a regular straightedge, but how to draw a smooth and symmetrical curve up and over the windscreen was a real head-scratcher.

For this you need something stiff but flexible, and it has to be able to bend in multiple directions, so my usual go-to long flexible straightedge wouldn't work. A length of nylon tubing seemed like a promising approach at first, but I didn't like the results I got from trying to mark a straight line using a piece of round tube. I hunted all over the house to find something suitable, and even took a couple trips to the hardware store, before I stumbled upon a workable idea. It turns out that a piece of exterior door weatherstrip is almost perfect for this. The kind with a hard rubber edge, normally meant to fit into a kerf slot around a door, has just the right combination of rigidity and flexibility to lay out a nice curve, and the flat edge makes it a no-brainer to draw a line against. You could probably walk over to your nearest exterior door and pull a length of this stuff out of the jamb, but I happened to have a piece stashed in the attic, so I just used that. Or just go buy a piece from your local home emporium, and then as a bonus you can use it to replace the old worn-out weatherstrip in your house.

I put some small reference marks in several places on each side of the windscreen, so I could be assured of getting a symmetrical shape. You can also see here where I marked a red line on the fairing, which is 1" up from the edge of the plexiglass all around the base of the windscreen. That helped me avoid trimming too much, which would have been a catastrophe.

Then I just clamped and taped the weatherstrip in place, lining it up to the reference marks, and it automatically connected the dots into a smooth curve. I got up on a ladder to eyeball it for symmetry, and it looked really great. From there, tracing the edge of the weatherstrip with a sharpie couldn't have gone better.

I didn't photograph the process of trimming the top of the windscreen base fairing, but it was the usual drill with snips, files, and deburring tools. Here's the final result, which I'm very happy with. The overlap between the fairing and windscreen is 1" or better all the way around, and the shape looks really good.

Back up on the ladder, here's what the end result looks like. I'm very pleased with how this turned out:

Now back to the rollbar fairing… I marked a new cut line to trim the forward edge, with a radius at the bottom to give a nice-looking transition to the windscreen base fairing:

To cut the inside corner I used the nibbler to sneak up to the edge, then did the usual grind/file/deburr thing:

It took a few iterations but I'm happy with how this looks:

I still need to do some work at the bottom corners along the longerons, but otherwise I now have all the fairing edges trimmed to their final shape. Looking good so far:

Aluminum rollbar fairing

Sunday, April 25th, 2021

The next step of the aluminum canopy fairing odyssey is to make the cover strip that goes over the top of the rollbar and bridges the gap between the windscreen and canopy.

First I had to work on shimming the windscreen away from the rollbar where necessary to make it flush with the canopy, or at least as close as possible. I found that taping popsicle sticks to the windscreen was useful to help visualize how the end result will turn out.

With an aluminum top strip you have a bit less ability to hide mismatched heights than with a fiberglass fairing, but you also need a bit of wiggle room to let you close the canopy safely, so you want to avoid a totally flush fit. I shot for a consistent gap of at least 1/16" all around, and shimmed the windscreen to get as close to that measurement as I could. For temporary fitment purposes I'm using stacks of plastic washers of varying thicknesses, held in place with masking tape:

After I had the shims more or less figured out, I cut up some more poster board and got busy making templates:

Refining the initial shape… I am intentionally creating these "elephant ears" at the bottom so I will have enough material to create a nice-looking radiused contour to transition from the top fairing to the side fairings:

I forgot to take pictures of the next couple hours of work, but basically I decided to make a partial practice fairing out of a scrap of 0.020" aluminum that I had in my scrap bin. Onto this I traced my work-in-progress pattern, then drilled the topmost fastener hole. With the test fairing clecoed to the rollbar at the top, I worked my way downward, marking and drilling one hole at a time. For each successive hole I removed the fairing so I could drill it and deburr, then reinstalled and continued to the next hole. This was time-consuming but obviously you don't want to be drilling into your plexiglass.

To locate the holes, I laid out some guidelines that I could use to re-measure the hole locations, which is a technique that I often find more accurate than using a hole finder. As I continued down towards the longeron I was able to tweak the fit at the aft edge of the test fairing by pulling forward on the lower corner to force it to conform to the required compound curve. All in all this was a successful test, and I'm glad I did it because it helped me refine the shape of my template, by adding more material to the aft edge so I'd be able to pull the bottom corners forward.

Once I knew it was probably going to work, I taped my full-sized template to a six-foot sheet of 0.040" aluminum and marked my initial cuts:

I think my hands are going to hurt tomorrow – that was a lot of 0.040" material to cut with hand snips! Of course I deburred all the edges even though this is going to get trimmed back further – don't want to risk scratching the plexiglass.

After having practiced on the test piece, I knew what to expect with the full-size article. I clecoed the center hole, then worked my way downward one hole (per side) at a time, removing the fairing each time to drill and deburr.

I continued until I had all the holes drilled and the fairing clecoed through the plexiglass into the rollbar. To get the fit I wanted, I pulled the lower corners as far forward as I dared – and came close to running out of edge on one side, despite thinking I'd left plenty of extra material. Luckily I managed to just make it work.

Test fitting with the windscreen base fairings installed – looks pretty good so far:

After some consideration, I decided a 1" overhang (measured from the aft face of the rollbar) would be plenty. The shorter your overhang, the better the fairing will fit the canopy due to the curvature, and the less chance it will get kicked by passengers climbing in and out. For my airplane, 1" will just cover the aluminum trim strip that goes over the front of my canopy, so it's a natural place to end the top fairing.

I marked the lines shown in the above photo by taping a ruler to a scrap of wood, with the ends offset by 1". I ran the wood stick around the inside of the fairing, being careful to keep it square, and used the ruler on the outside to trace my reference line. This was super easy and worked great.

My woodworking assembly table turns out to be quite useful for making cuts in large pieces of aluminum. I'm able to use the grid of dog holes to clamp the piece vertically to the table, using some wood scraps to avoid marking it up. This lets me use both hands on the snips, which is a huge advantage when making cuts in this kind of thick material. It makes it handier when filing cut edges too.

Accidental shop art:

Here's the fairing with the aft edge trimmed back to leave a 1" overhang. I deburred it pretty well, but may still eventually take a fine file to it to make sure it looks absolutely straight. Still, it's not bad right now:

I'm pretty happy with the gap I achieved – between 1/16" and 1/8" all around. That should be big enough to avoid it getting hung up when opening and closing, but small enough that it's not noticeable unless you really look. If you examine this photo closely you can just see the aft edge of the canopy trim strip peeking out:

The last thing I managed to accomplish was to locate and drill the bottom-aft hole on each side of the airplane. These will help hold down all the various fairing pieces as I move on to the next step, which will be to trim the remaining edges. But that's enough work for one weekend!

Reinstalled canopy

Sunday, April 25th, 2021

I picked up the sliding canopy rails, intending to reinstall them on the fuselage, but then I noticed that the slot for the canopy lock was kind of rough-looking by my current standards. Not a surprise, since I made this slot long before I owned a milling machine. So, I cranked up the mill and went to work cleaning up the slot:

There, that's better – properly parallel edges and uniform corners:

Then I took the canopy rails to a local metal finishing place to have the extrusion marks polished out, and a satin finish put on. Fast forward a few weeks and they turned out looking really nice, although it's hard to tell in photos.

I'm trying to avoid "aircraft looking" hardware in the cockpit where I can help it, so instead of the usual AN507 screws, I attached the rails to the fuselage with stainless hex screws that I picked up from McMaster. No worries about strength, since these are actually rated for slightly higher tensile strength than the recommended screws.

Now the canopy is back on, hopefully for a good long time.

To keep the plexiglass from getting damaged, I protected the first few inches with a layer of 20 mil PVC tape, and put a plastic sheet over the rest:

Aluminum windscreen fairing

Saturday, April 10th, 2021

The fairing at the base of the windscreen is typically made from fiberglass, with small metal clips buried underneath to provide rigid mounting of the plexiglass windscreen to the fuselage. I've seen a few airplanes where this was done in aluminum instead, and decided I wanted to give that approach a try.

A helpful article detailing the basic process of forming aluminum windscreen fairings was published in the June 1997 issue of the old RVator newsletter. I had seen this reprinted in the "24 Years of the RVator" book, but not all of the pictures were included. Fortunately, a fellow builder sent me a copy of the original article, which I've hosted here. The extra photos make it a little easier to understand. I used this article, and also Andy Crabtree's VAF thread, as a jumping-off point for making my own aluminum windscreen fairings.

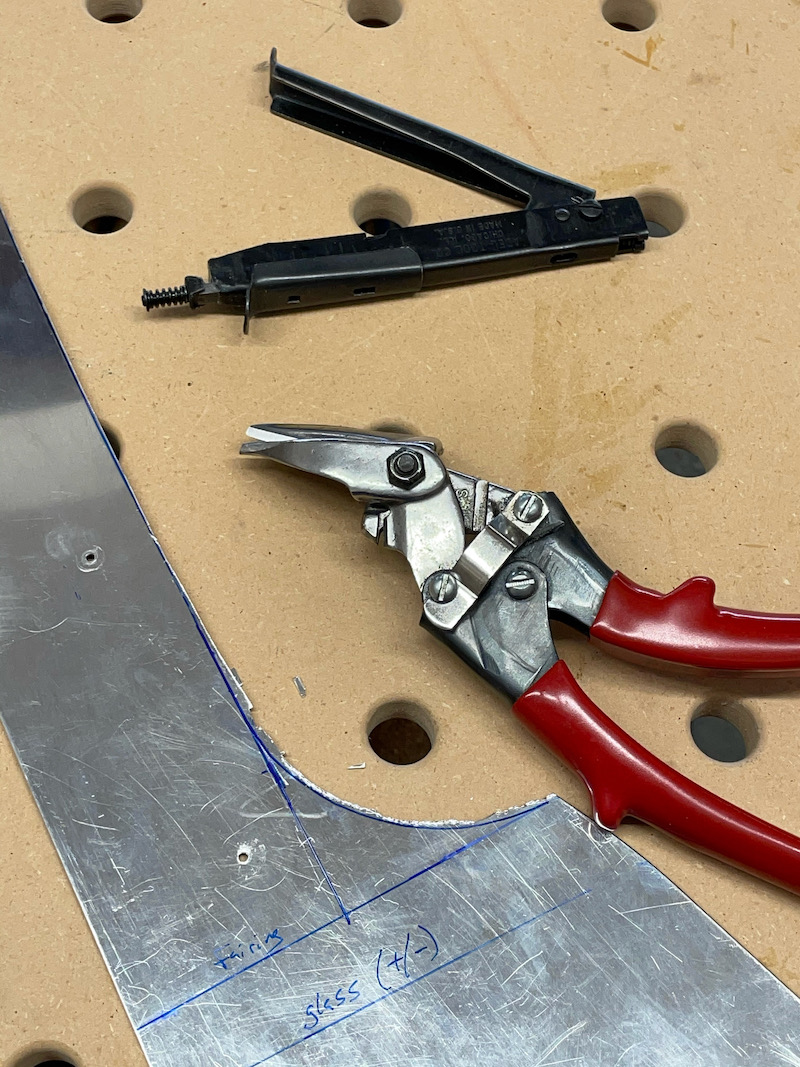
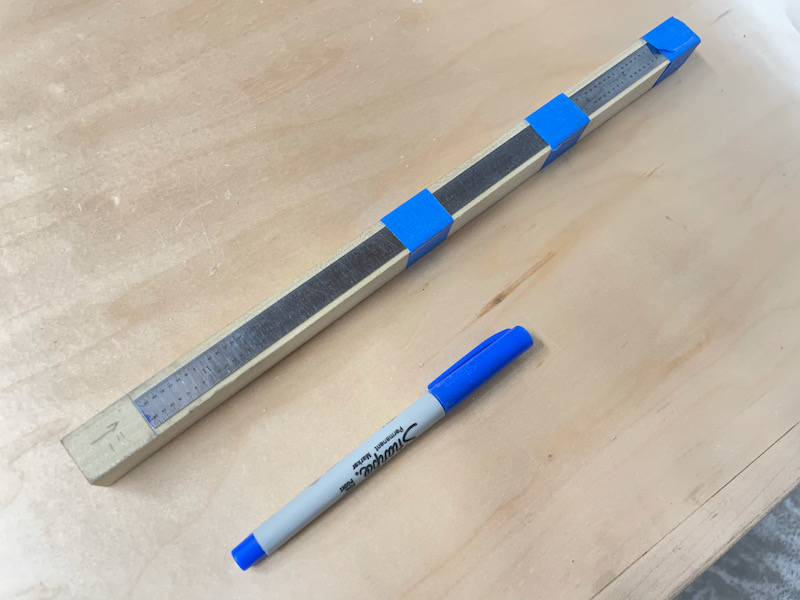
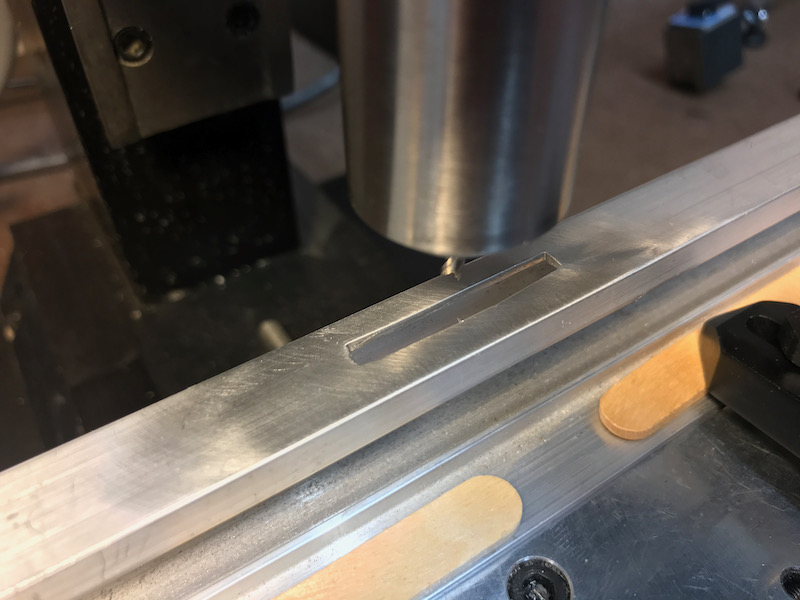
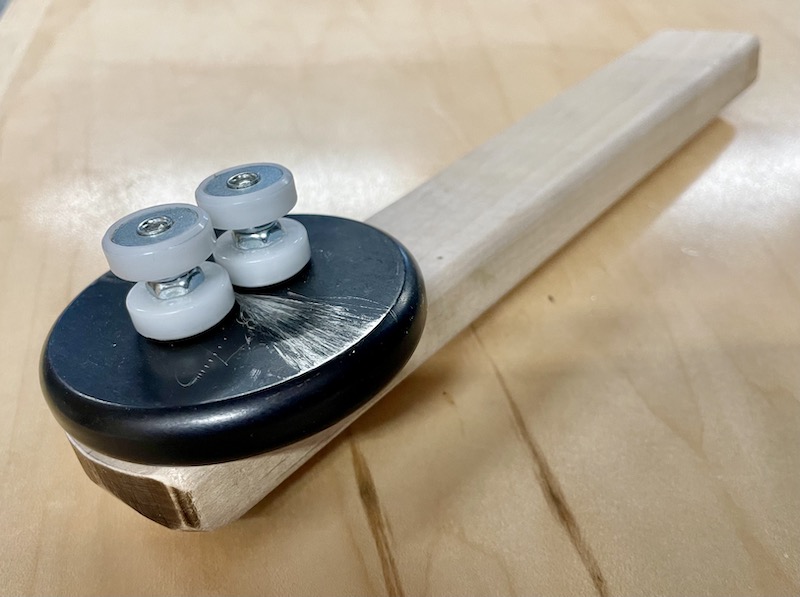
First I made this bending tool, which is nothing more than a normal edge rolling tool with the roller wheels doubled up and a short handle added. Two sets of rollers stacked up allows you to bend a flange 11/16" deep. The handle I made from a scrap of maple, and since I now have easy access to a router table I rounded the edges to make it easier to grip, but these are purely optional improvements.

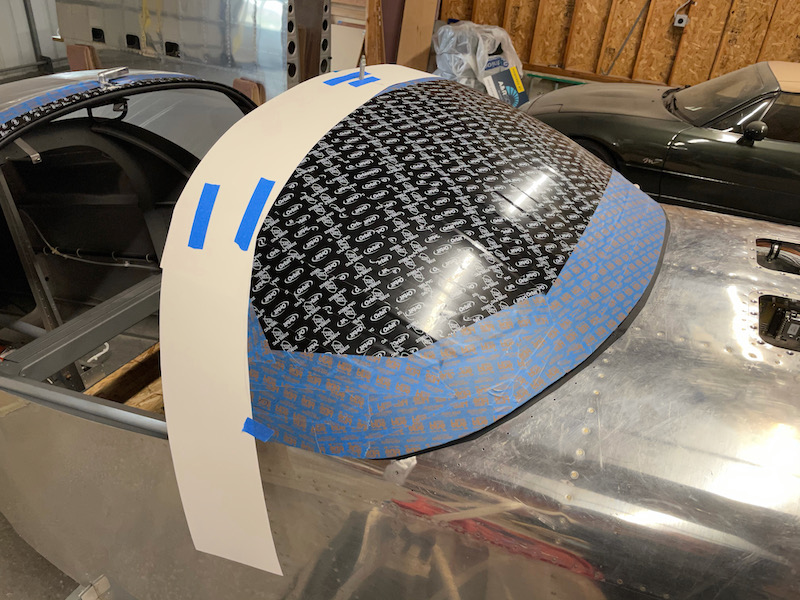
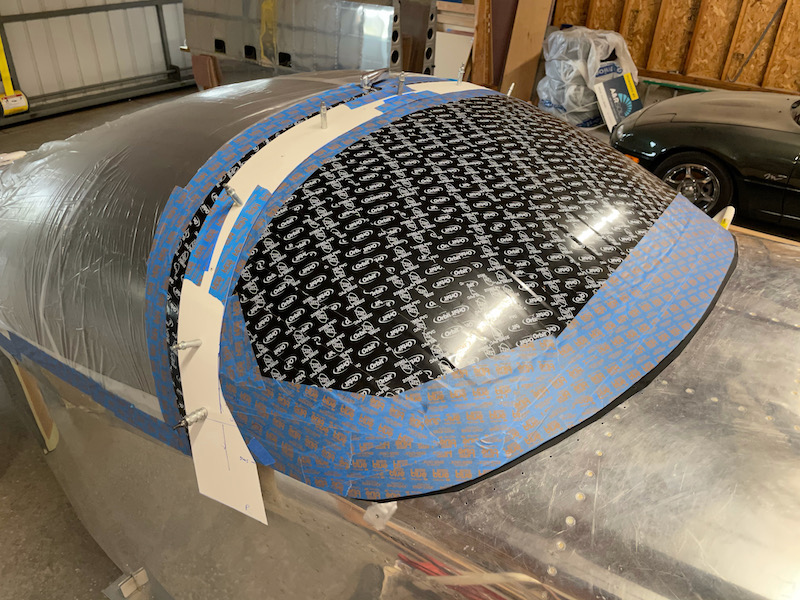
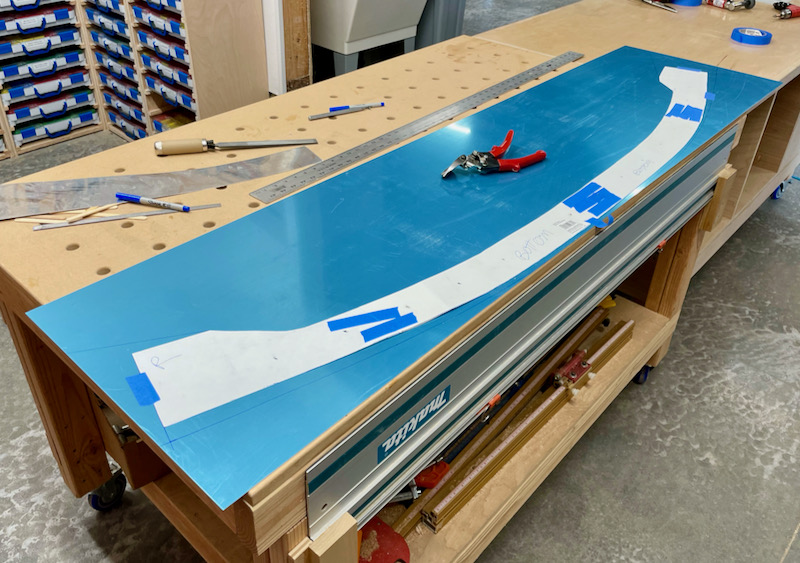
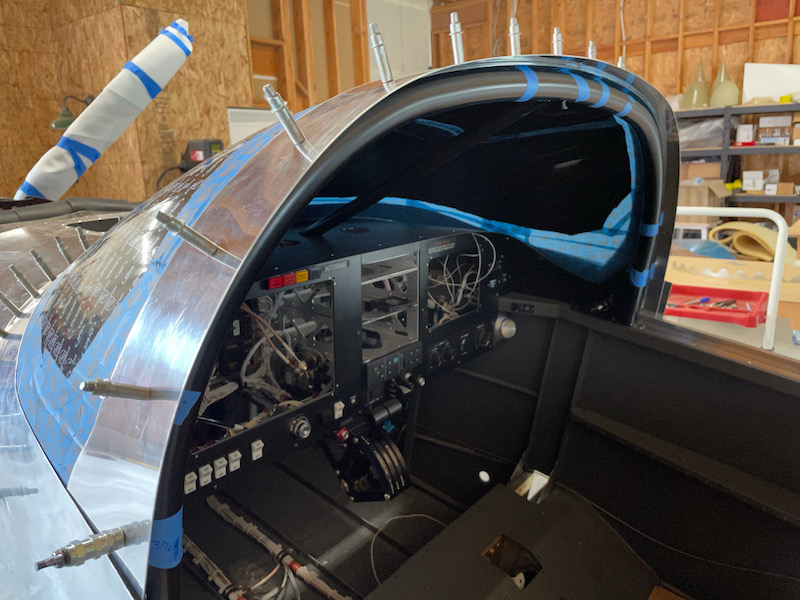
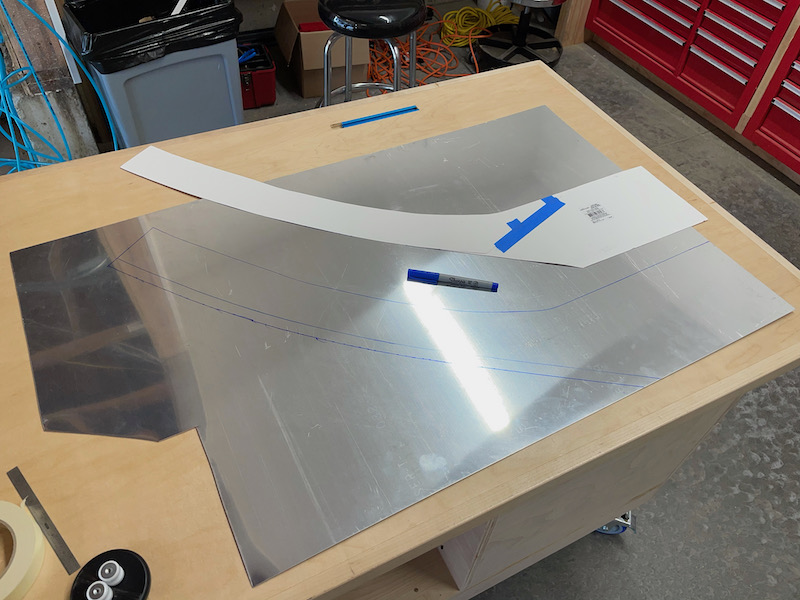
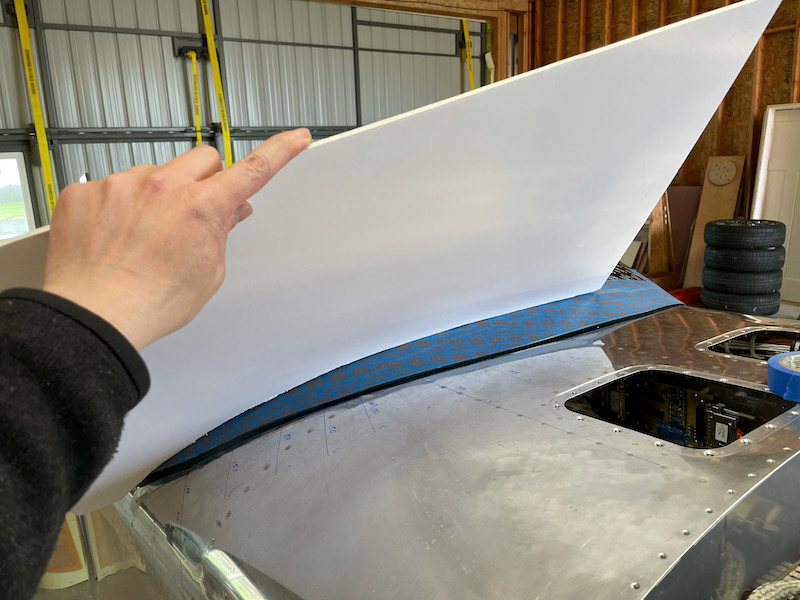
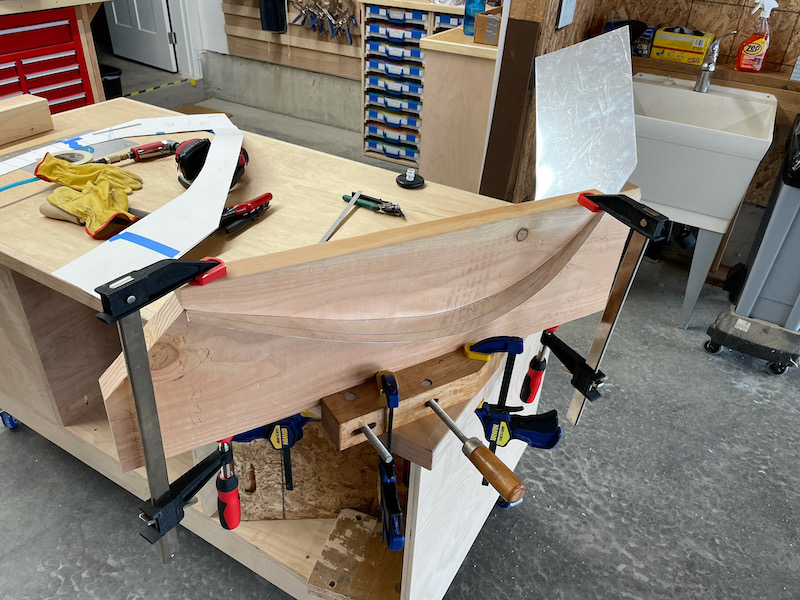
With the windscreen clecoed to the roll bar, I made a posterboard template of one-half of a fairing, with the front edge being right at the point where a line tangent to the windscreen intersects the fuselage. This took several iterations to get the shape just right, using a flat piece of scrap aluminum to determine the windscreen/fuselage intersection point. After this picture was taken I trimmed the top down to about 3" from the fuselage skin; it will get shaved down further later on.

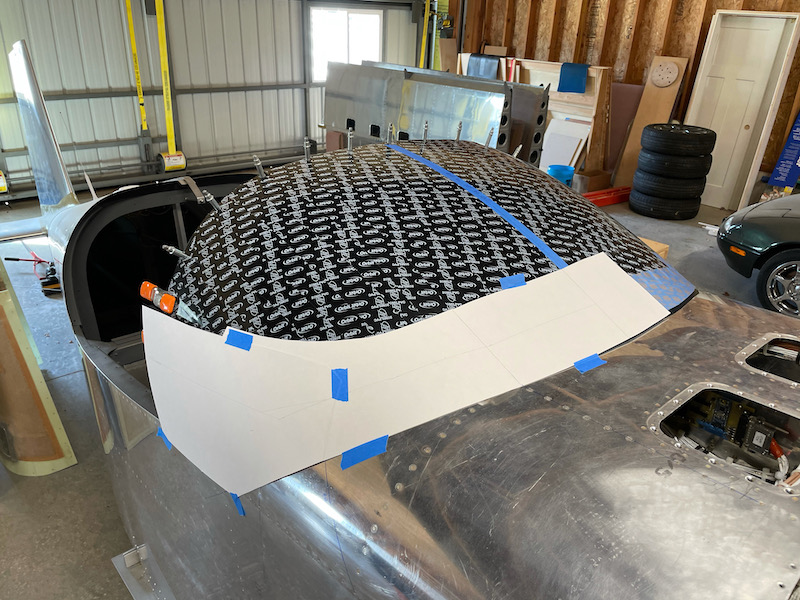
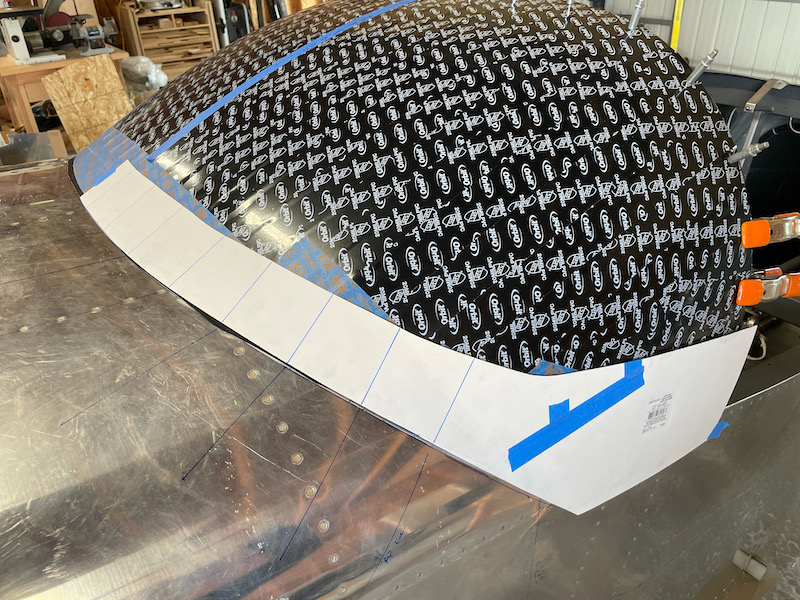
The same template, reversed, fits adequately on the opposite side of the windscreen. Note the reference lines marked on the template and fuselage to help align the pattern in the same place between progressive trimming sessions:

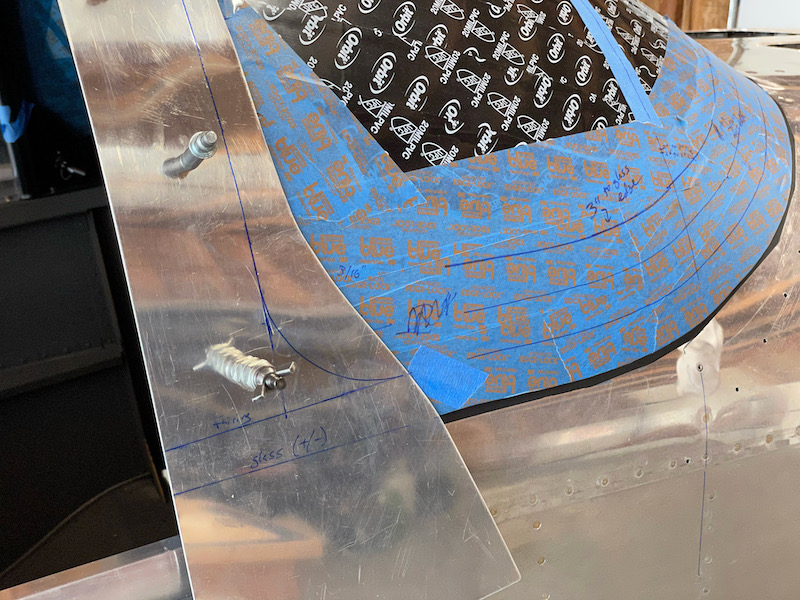
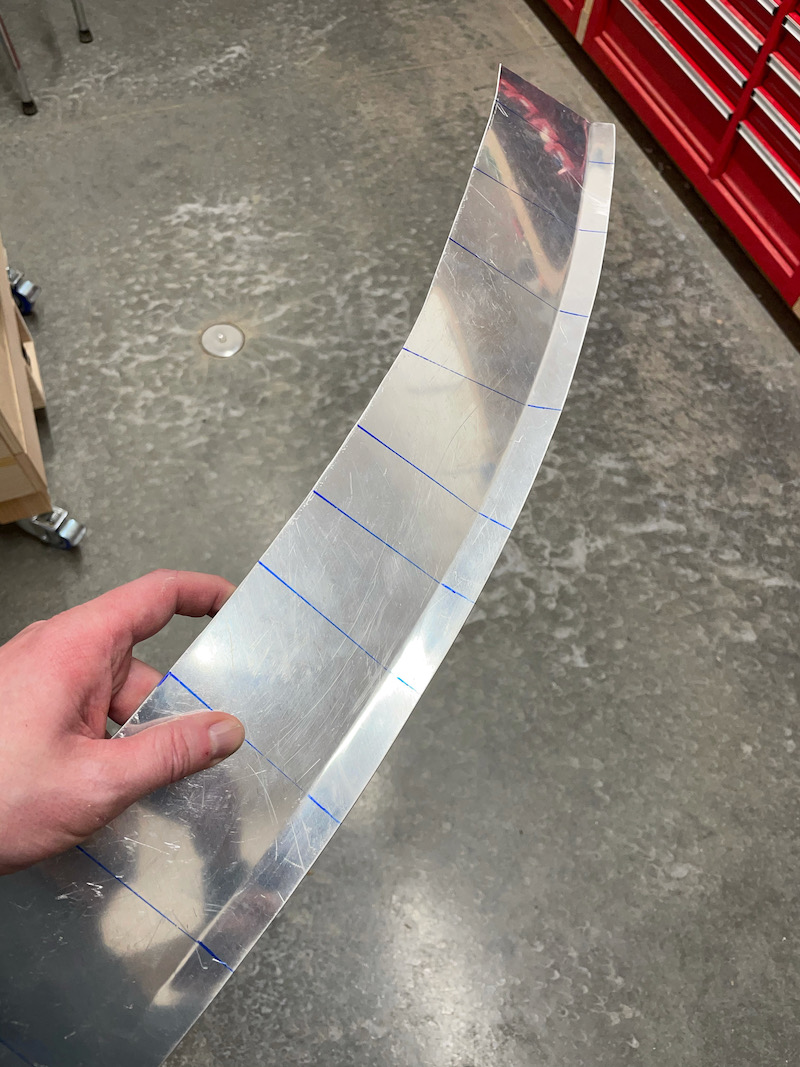
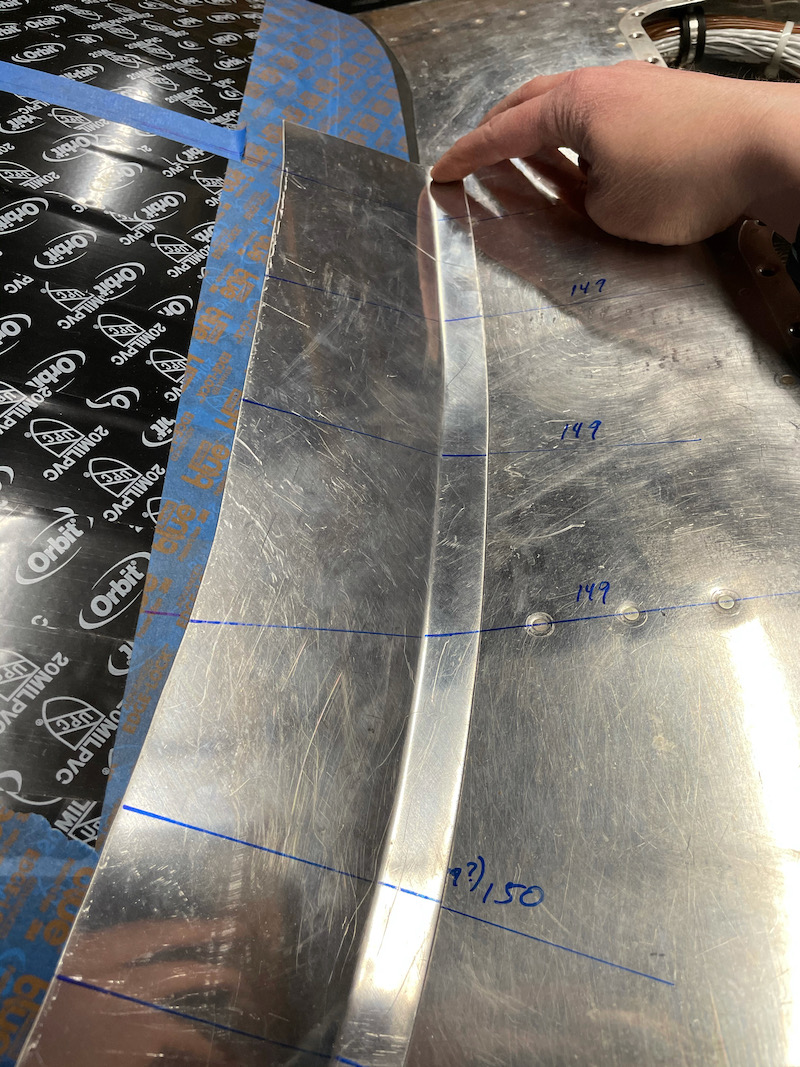
I traced the template onto a sheet of 0.032" alclad, then extended the forward edge a further 11/16":

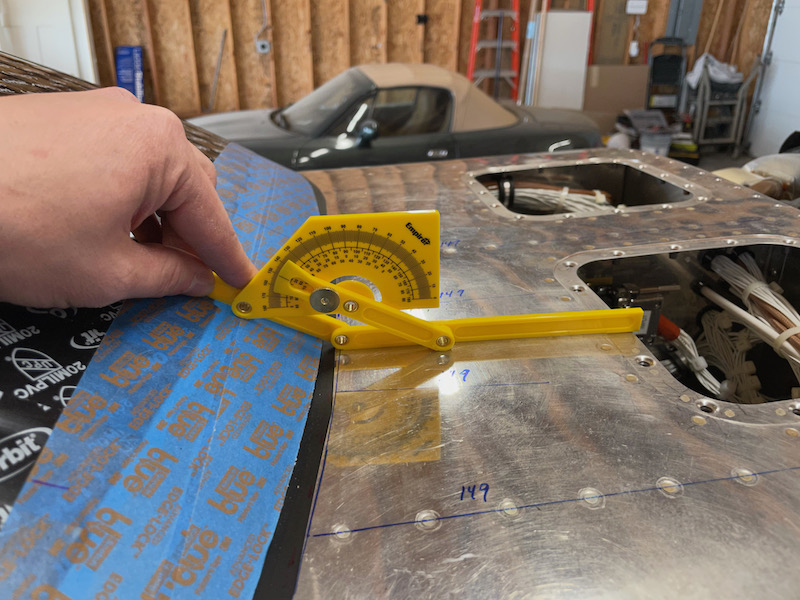
I used an angle finder to measure the angle between the windscreen and fuselage every few inches, and marked the resulting angles on the fuselage and on the template:

Then I took a piece of foam board and trimmed and sanded it until it fit the contour of the bottom of the windscreen, along a straight line from the center of the windscreen out to the corner. I don't think the actual path this follows is super critical, as long as it spans as long of a distance across the windscreen as it's possible to trace in a straight line.

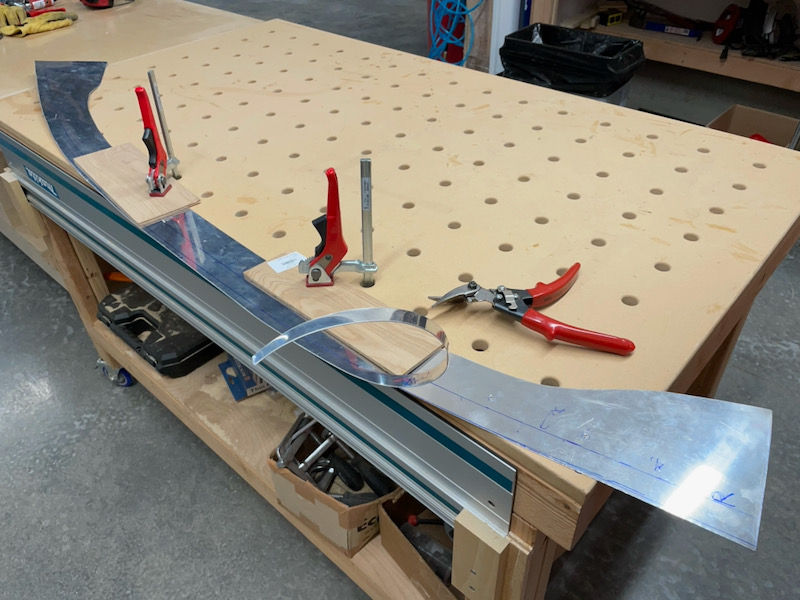
I used the foam template as a pattern to cut the same curve into a scrap piece of 2×10 that I had fortuitously been saving. This makes a jig that the fairing halves are clamped into while you form the mounting flange.

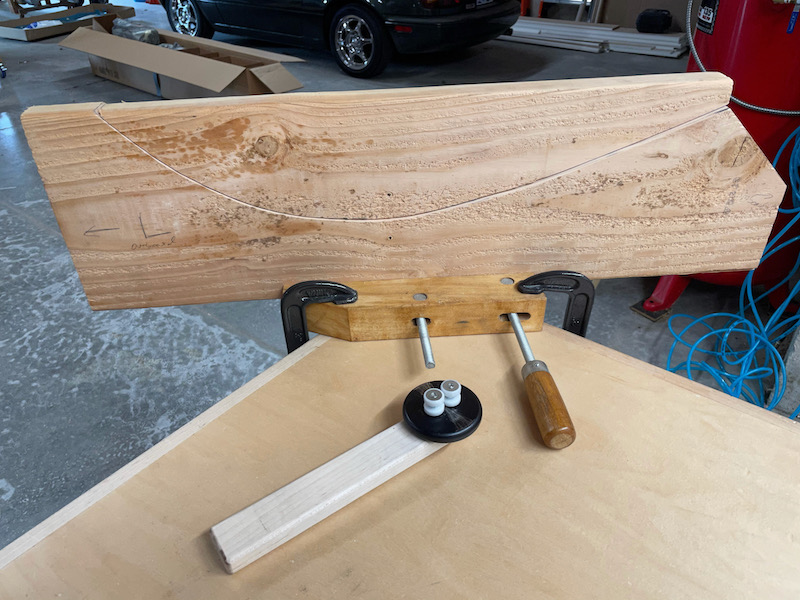
Then it's just a matter of clamping one fairing half into the jig and working the rolling tool across the flange, slowly and smoothly bending a little at a time. The jig makes the fairing conform to approximately the shape of the windscreen/fuselage intersection, while you bend and stretch the metal at roughly right angles to the jig. You just roll the tool back and forth for a while, applying a steady bending force, then take the part out of the jig and test-fit. Take note of the spots that have been bent sufficiently and those that still need more work, clamp it back in the jig, and repeat.

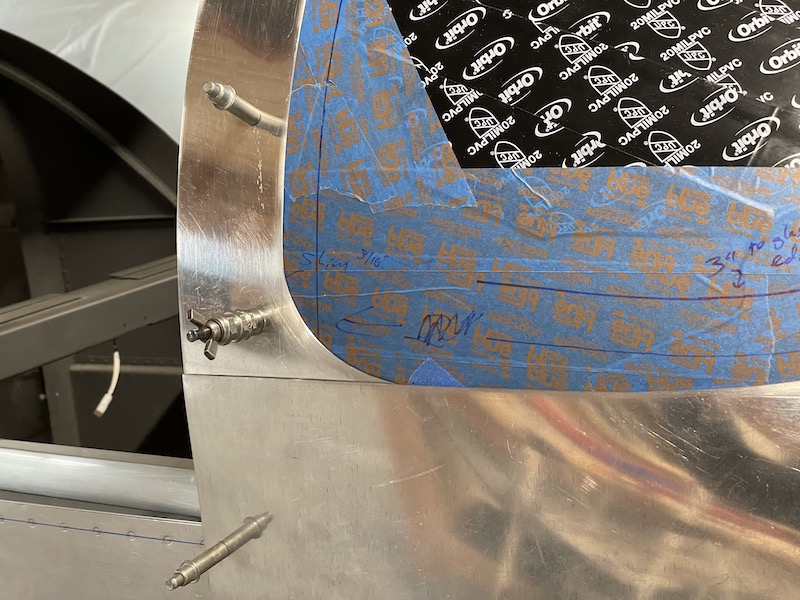
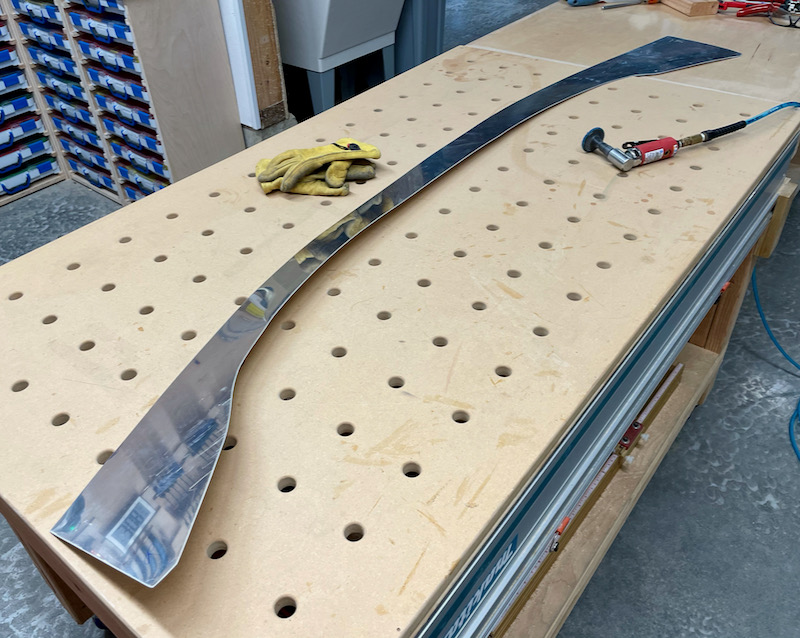
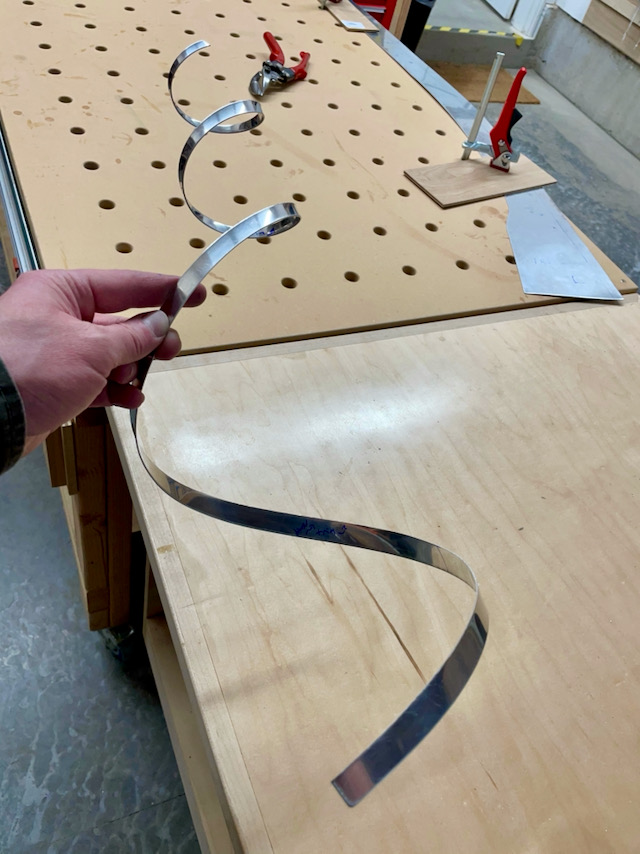
It took some sweating to get to this point, but surprisingly it wasn't all that difficult to create this three-dimensional curve:

At this point I started to think I might be able to make this work. It took a couple hours to make these parts, but the fit at this stage was really starting to look promising. I did sort of pay attention to the angles I'd measured earlier, in the sense that they helped me know in advance which spots would require the most bending, but I didn't intentionally attempt to make the bend angles along the fairing match the measured angles on the airplane. If you think about it, a perfect bend angle would probably be too much, as you want a small amount of springback to prevent the fairing from lifting away from the plexiglass.

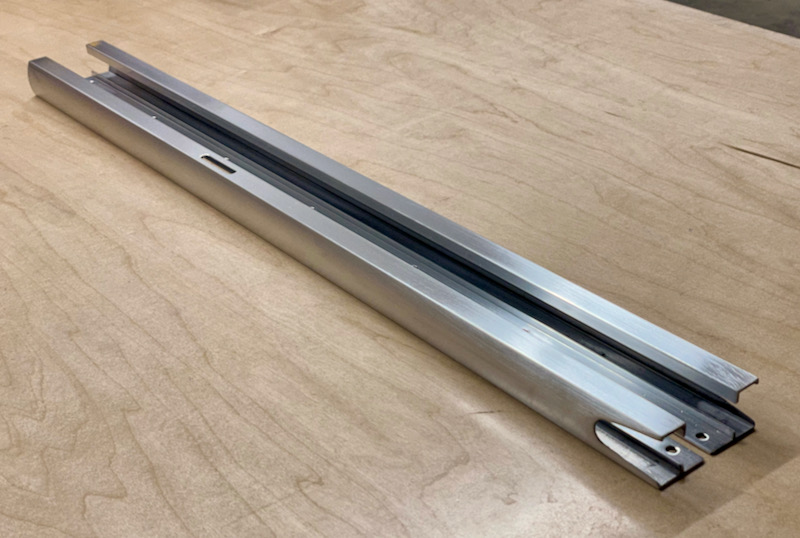
Anyway, I just kept after it until I had two mirror-image fairings that each seemed to fit pretty well:

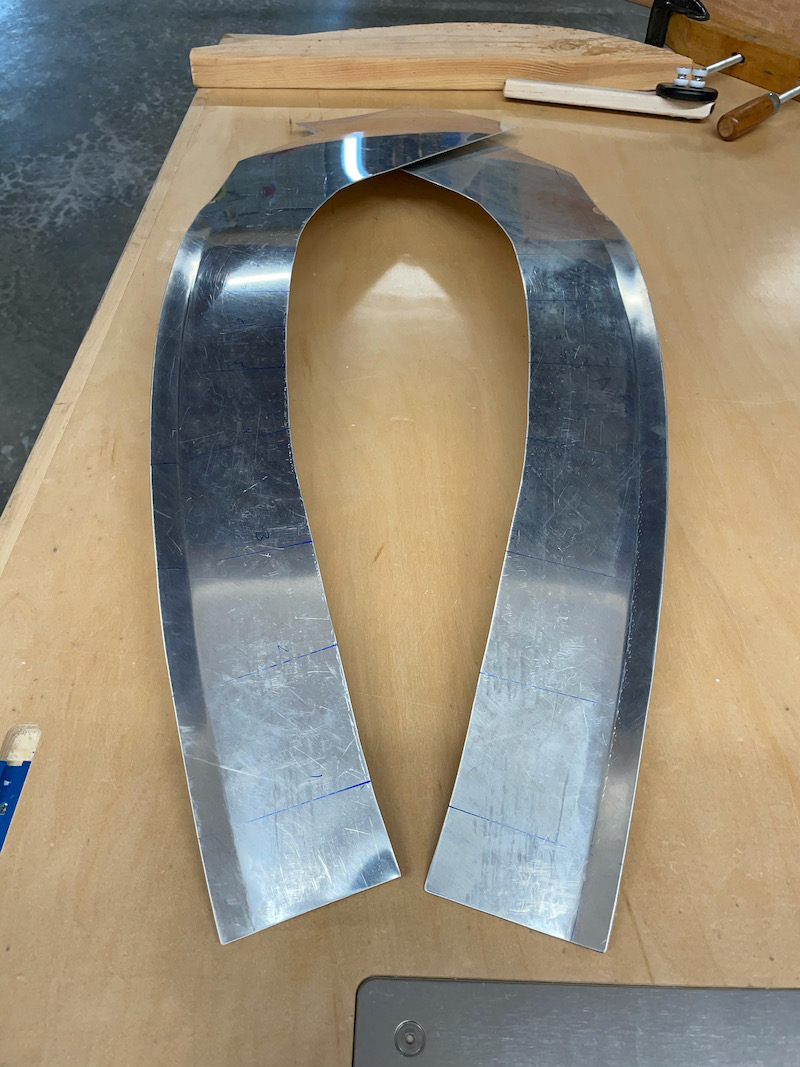
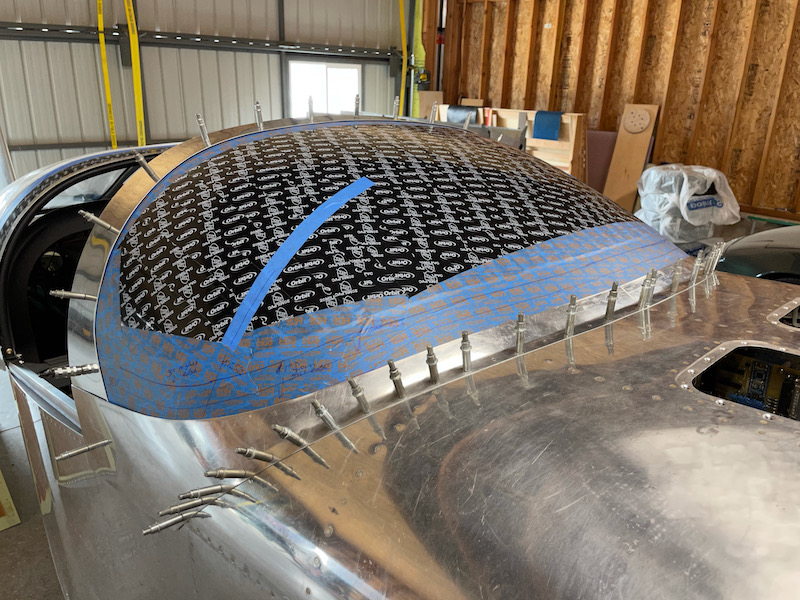
Up to this point I was just experimenting, and I hadn't done anything permanent. I figured if my test pieces turned out to be not so great, I'd either scrap them and start over, or give up on the entire idea and go with the default fiberglass fairing option. But things were going so well, I figured I might be able to pull this off after all. So, I bit the bullet and drilled one hole at the inboard end of the right-hand fairing, which I then drilled and clecoed to the fuselage. That in turn allowed me to continue to fine-tune the fit in the bending jig, with the cleco acting as a third hand to help keep the fairing pulled tight.

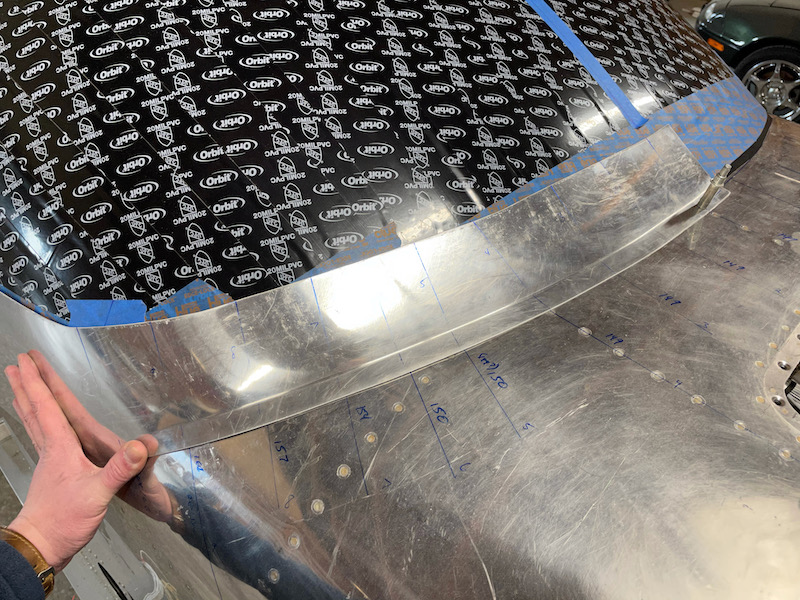
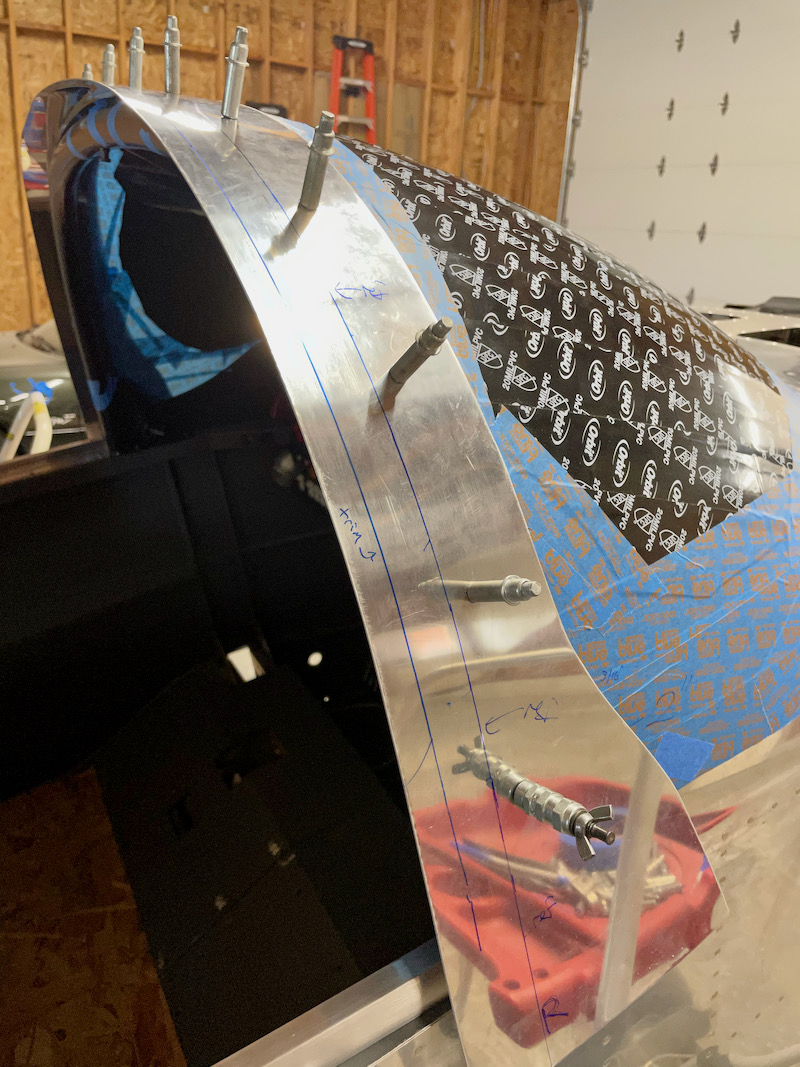
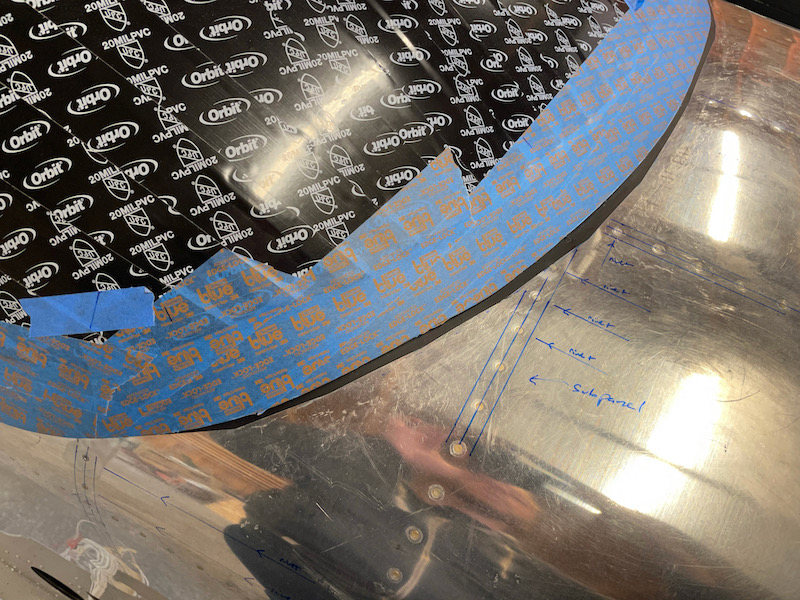
After a few more rounds of tweaking the bend angles I decided it looked good enough to keep going, so I marked the locations of the underlying subpanel and ribs in order to avoid putting a hole where it didn't belong. With careful rivet spacing you can either avoid the hidden structure entirely, or else place a rivet hole squarely in the center of a rib flange, as required.

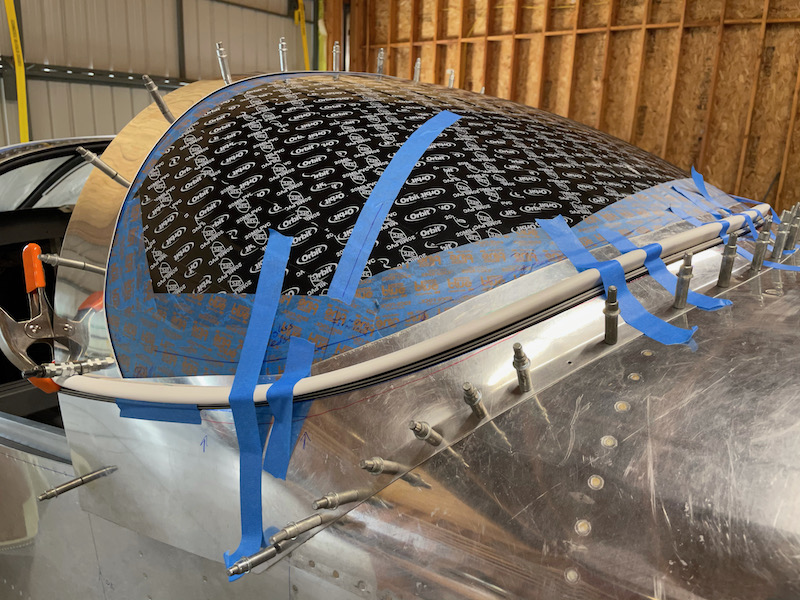
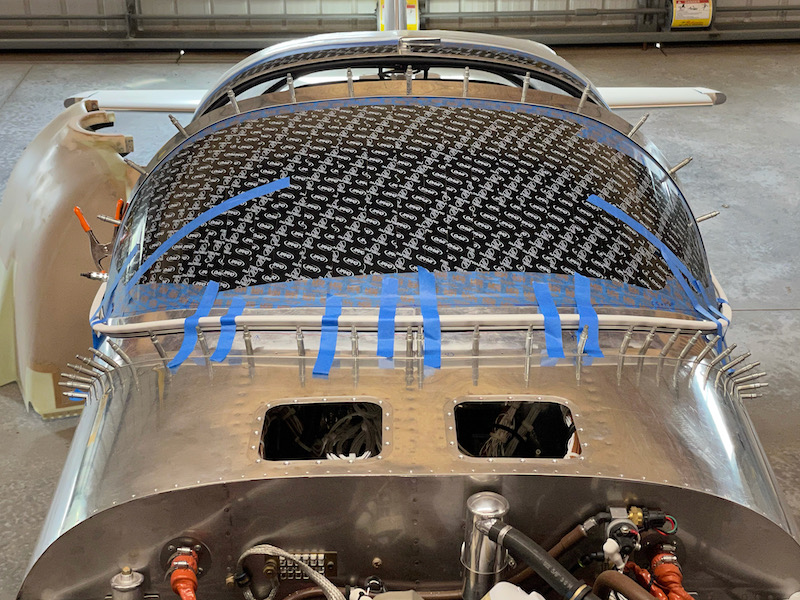
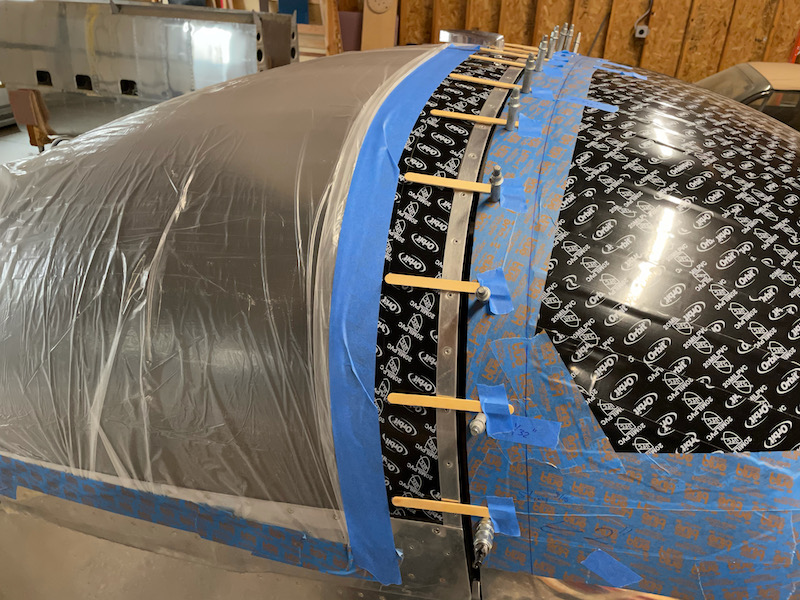
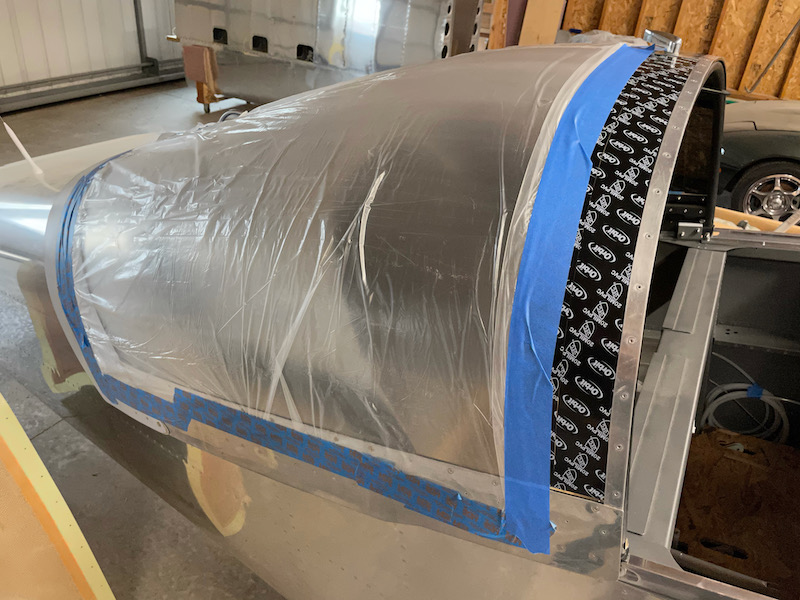
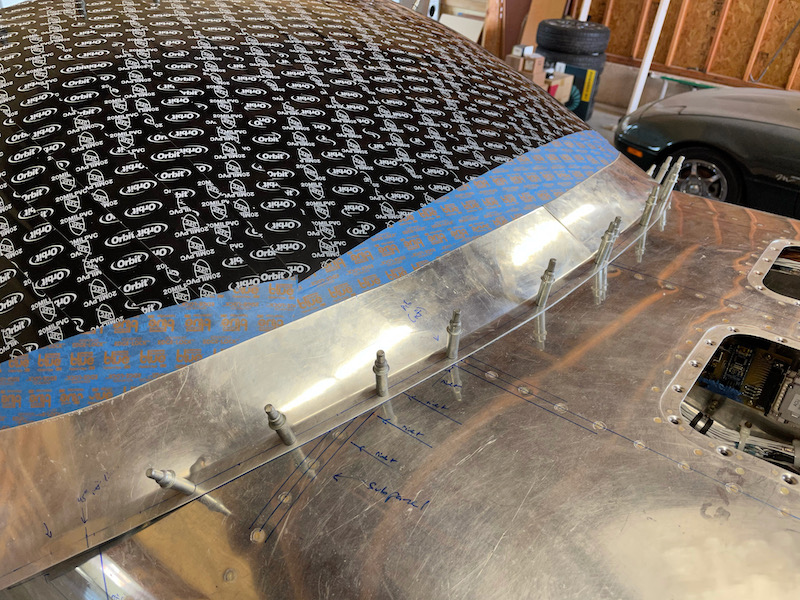
I kept moving downward, alternating from side to side. At some point during this process I trimmed the inboard ends of the two fairing halves so they'd butt together, which allowed me to keep them both clecoed in place at the same time. That's important to do because the fairings somewhat change the shape of the plexiglass windscreen in areas where it needs to be pulled tighter to the fuselage; they're essentially giant version of the small metal clips you'd use with a fiberglass fairing. Doing both sides at once prevents any asymmetry issues resulting from the windscreen bulging to one side. Working my way outboard and down, I carefully held each fairing half tight to the windscreen and fuselage skin before drilling and clecoing.
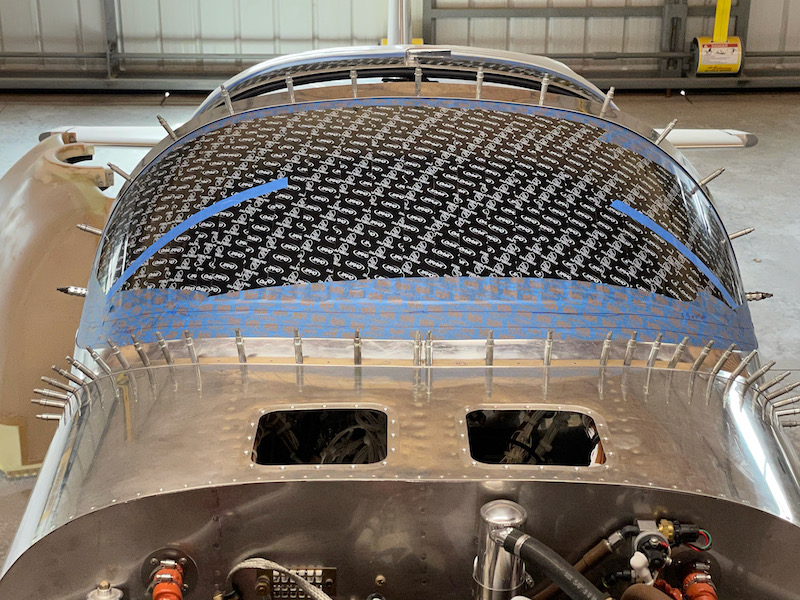
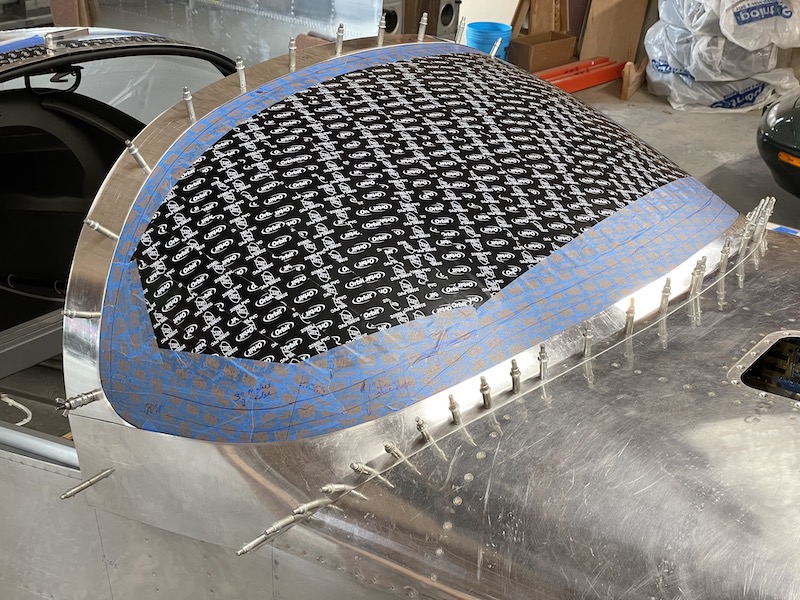
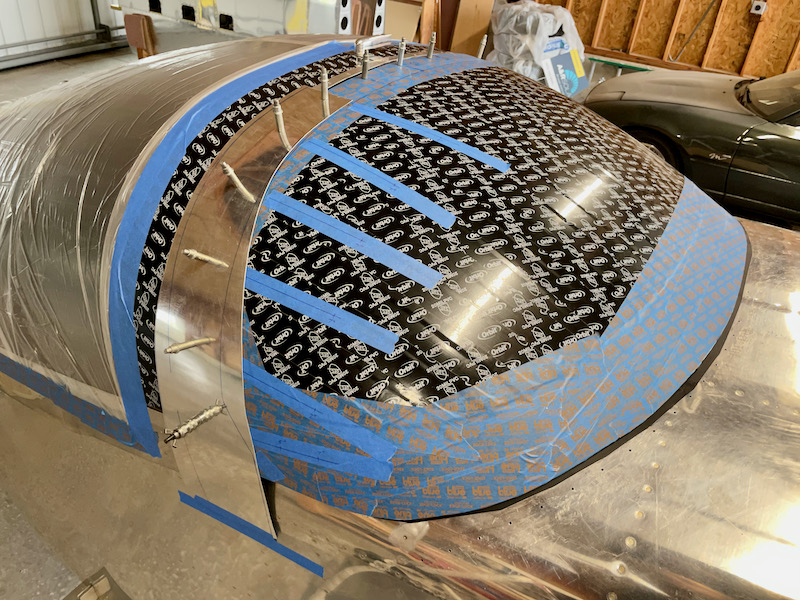
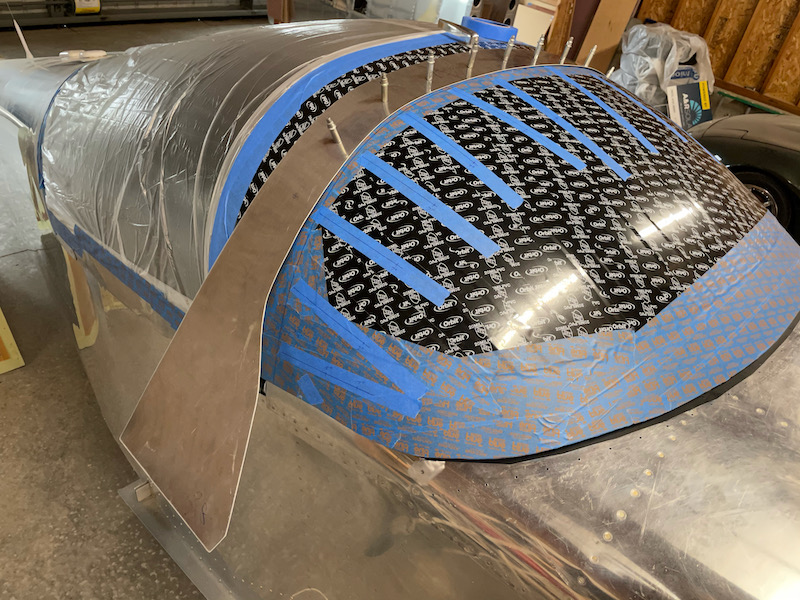
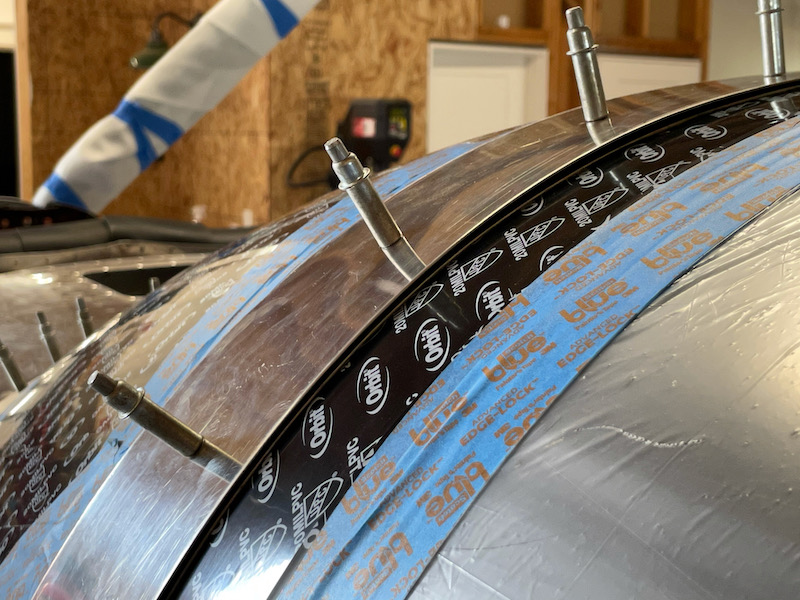
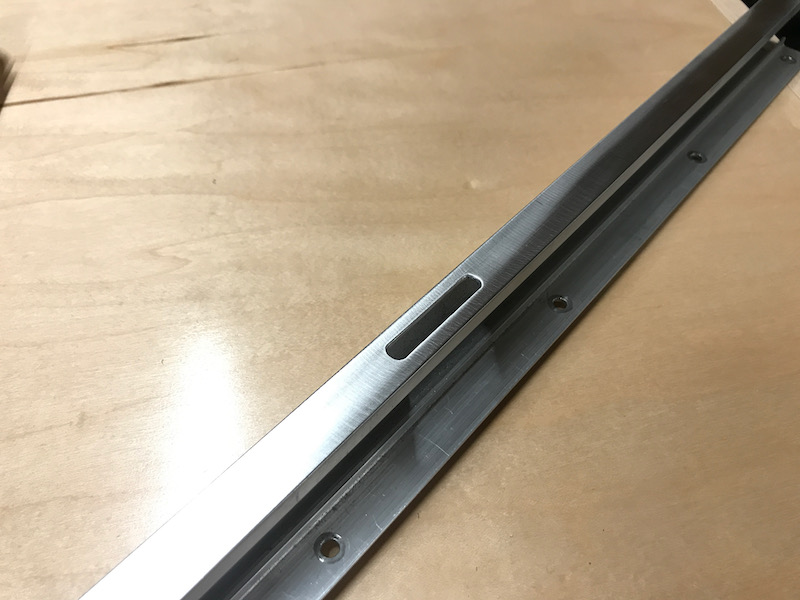
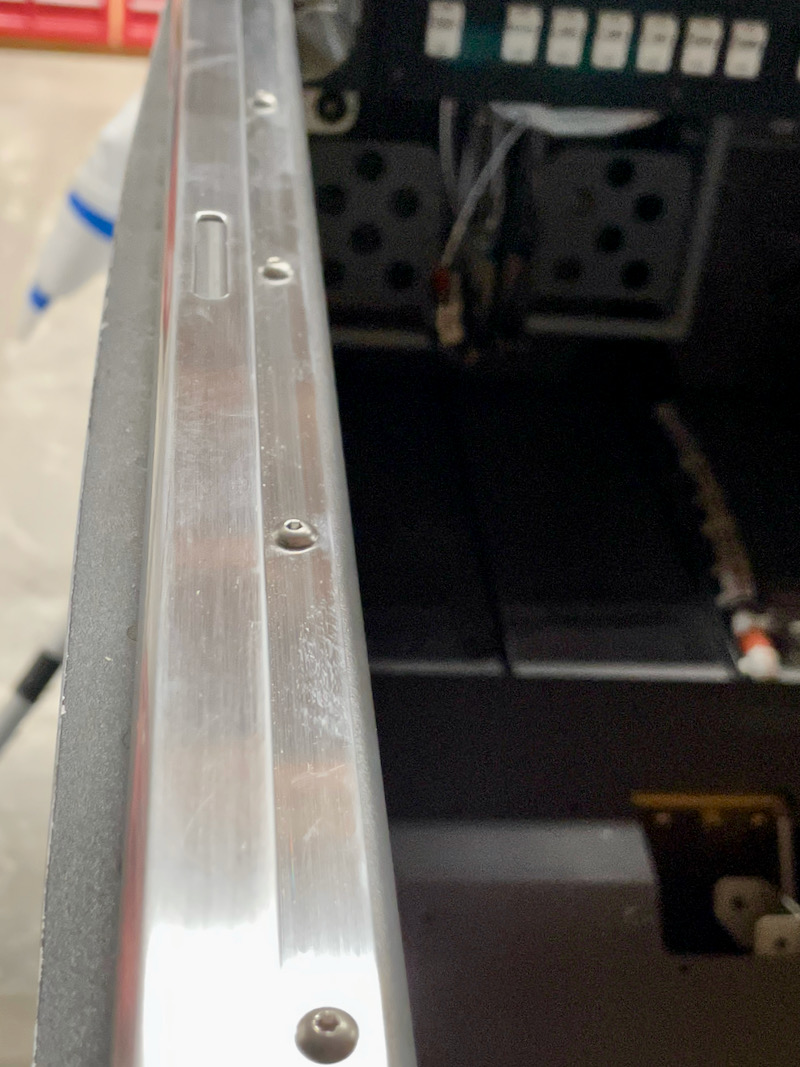
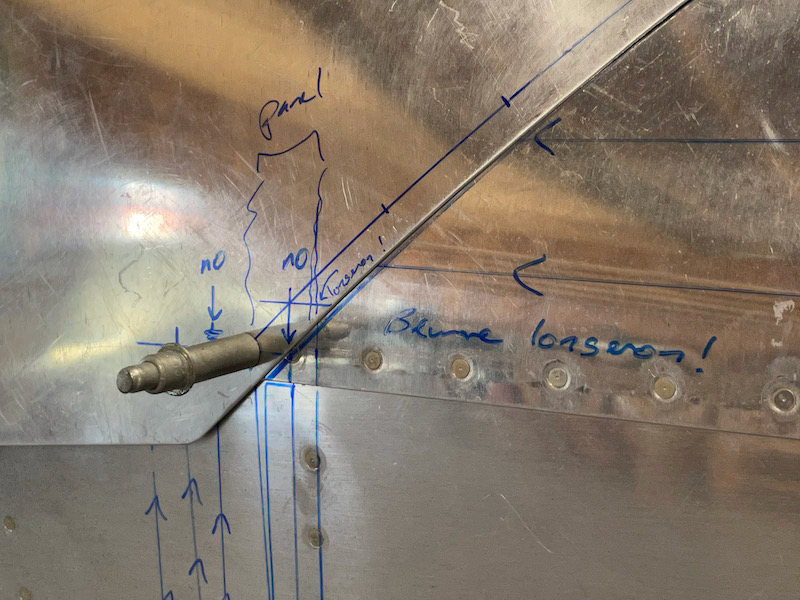
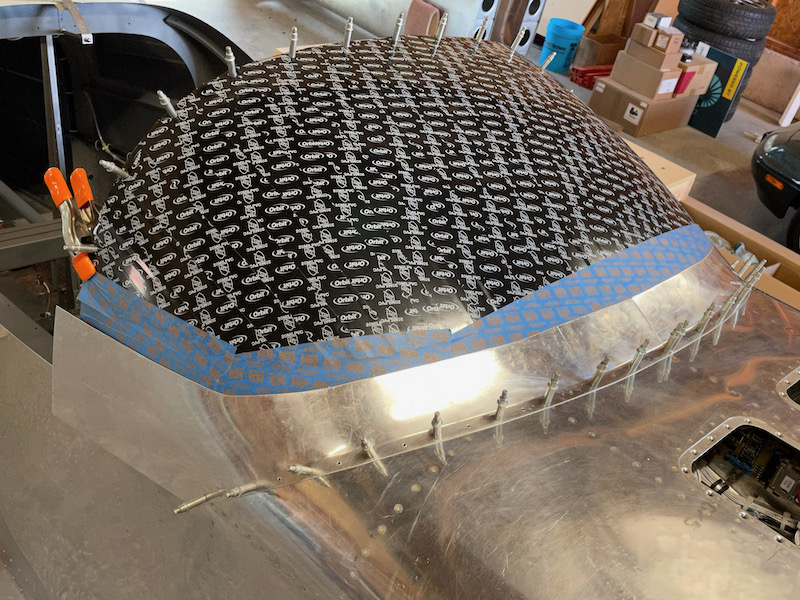
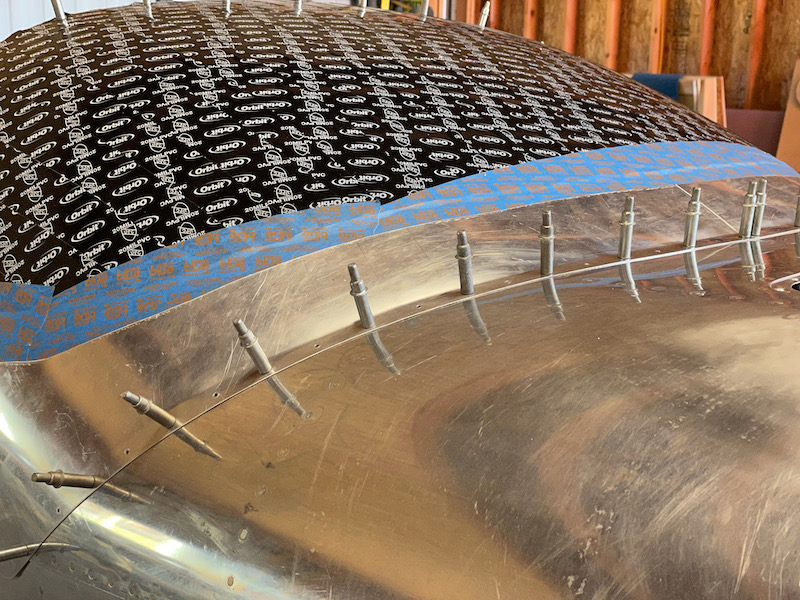
Once I got to about the 45ยบ point, I knew it was probably going to work, and my attention shifted to how the fairing halves were going to intersect the line of rivets along the longeron. Some judicious trimming of the forward edge enabled me to fine-tune where the row of fairing rivets would cross the longeron, ensuring that the rivets in the corners of the fairing would land cleanly between two existing longeron rivets. I very carefully marked the locations of everything I needed to avoid, triple-checked the fit, and drilled the fairings through the fuselage skin and longerons:

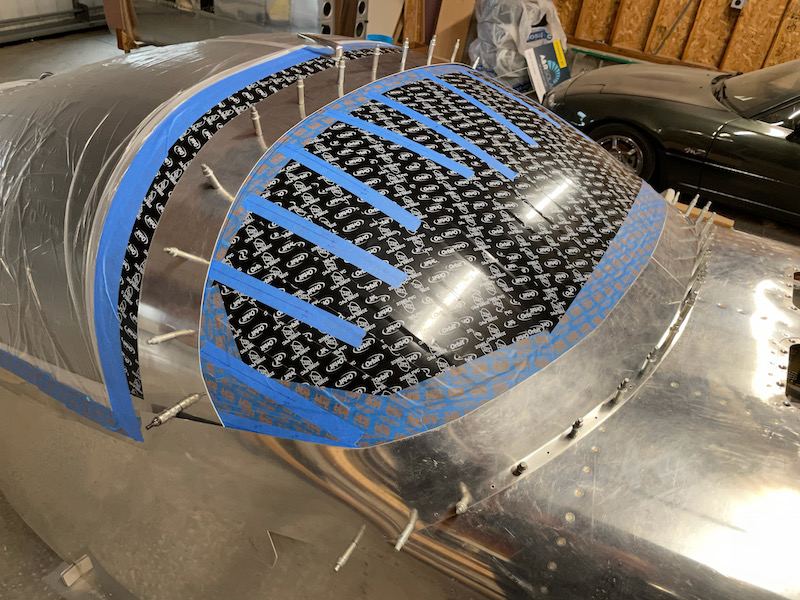
From there it was a simple matter of drilling all the remaining rivet holes. Happily, I was able to keep all of the skin holes above the longeron forward of the instrument panel, which means I won't see any unsightly rivet tails poking through the skin in the cockpit:

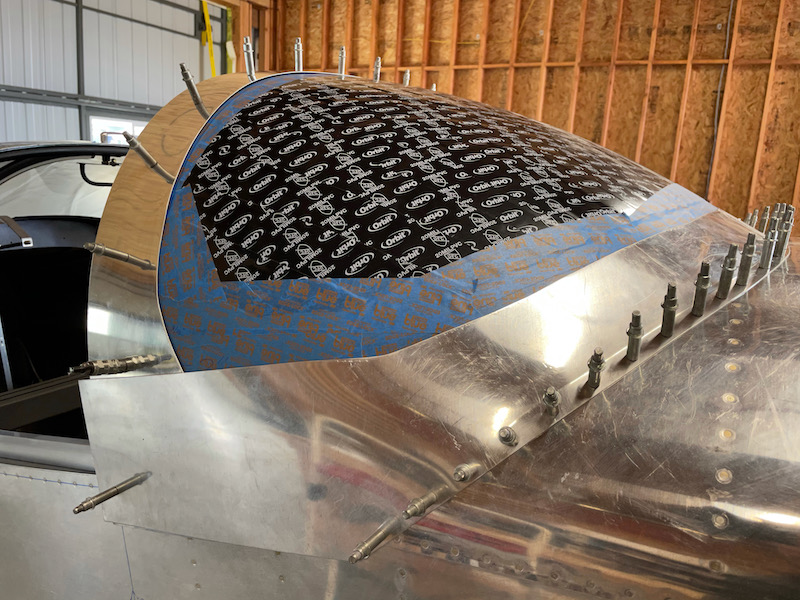
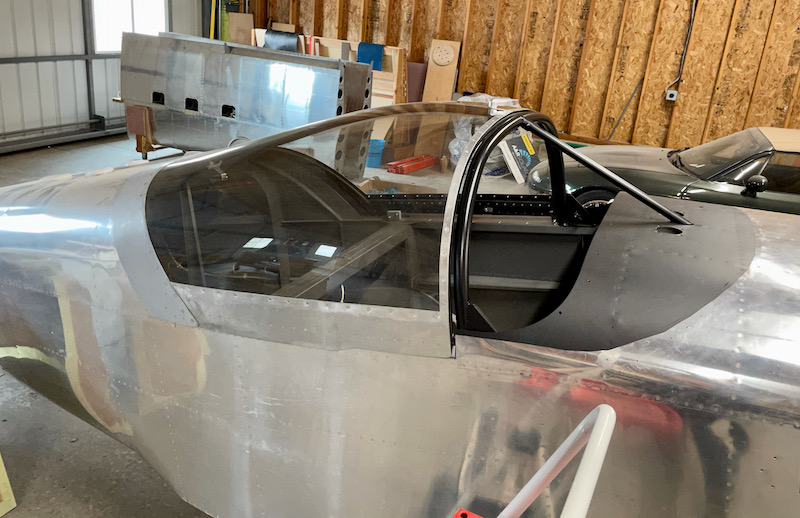
I'm really pleased with how this turned out. The aluminum fairing halves are almost a perfect fit to the windscreen, and the flange is almost a perfect fit to the fuselage. This process took me a couple of weekends, fumbling my way forward, but in retrospect it was so simple that I could probably do it again in half the time. I never thought I'd be able to achieve this kinds of result without first mastering all kinds of arcane metalworking skills, but to my great surprise my first "ehh, this could be a waste of time" test pieces ended up fitting perfectly the first time. And no sanding required!

I still need to trim the top edges, and fabricate a cover piece to go over the top of the rollbar, but that should be basic sheet-metal work, not the kind of obscure magic that produces compound bends.

Windshield prep

Friday, April 9th, 2021

So I guess the lesson here is, don't leave masking tape on your windshield for ten years? What a mess:

Fortunately naptha does an okay job of removing prehistoric tape adhesive, and is safe to use on plexiglass. But it's a slow process and it takes a ton of elbow grease.

It took over an hour of careful rubbing with naphtha-soaked shop towels to get to this stage, and there are still tons of little goo-particles stuck around the base:

Now it's finally clean, and I can quit sweating into a respirator mask:

I re-protected the windshield with an application of 20 mil PVC pipe wrap tape, which is known amongst the RV community to be safe to use on plexiglass. It's also quite thick, so to avoid fitment issues I used regular blue masking tape around the base where the fairing will go.

As long as I remember to take all this off again within the next few months, I should be able to spare myself another round of goo-cleanup.