This is a magneto. It makes sparks to make the engine go. It's ancient technology but it works without any source of external power and it doesn't have a single bit of software in it.
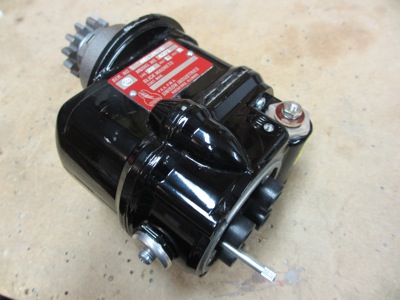
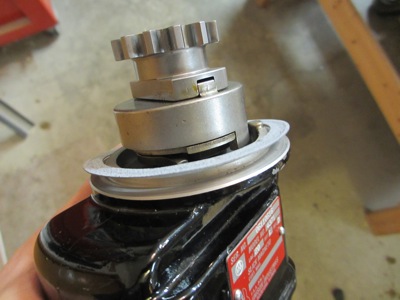
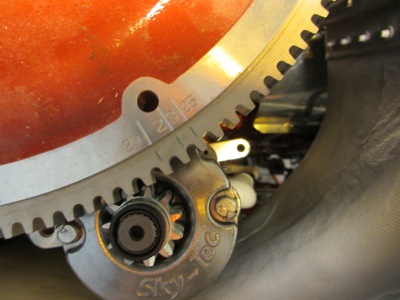
The silver business between the magneto and the drive gear is an impulse coupler. It's basically a spring-loaded clutch that changes the timing of the magneto during starting. When the magneto is turning slow, the spark timing is retarded by a set number of degrees so the cylinders will fire when the piston is right about top dead center (TDC). When the magneto is turning fast, it uses the normal timing that you set when you installed it. The amount the timing changes is call the lag angle. (Protip: Never take one of these apart if you can help it. I watched an amateur try to repair one once; the big nasty coiled-up spring came un-coiled and threw little parts everywhere. Some were probably never found.)
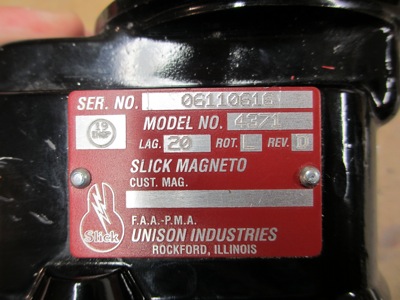
Here's the data plate for the magneto. The lag angle stamped on it is 20°. The "L" stands for "left-handed rotation", not "mount on left side of engine". It means that, when viewed from the rear of the engine, the mag will rotate counter-clockwise (left) when the engine is running. Although, confusingly, we actually are going to mount it on the left side of the engine.
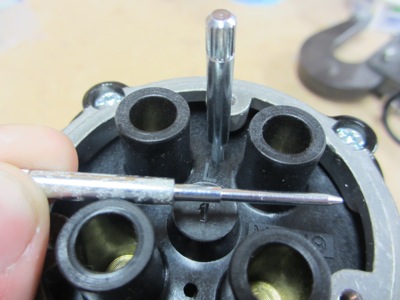
The thing sticking out of the back of the magneto is a T118, better known to you and me as a timing pin. You want to gently insert it into the hole that corresponds to the mag's rotation direction ("L" in this case) and wiggle the gear train around until you feel it drop in. Here I'm holding a second pin to give you an idea of what to look for. You want to have it drop in to where the first shoulder (the smaller-diameter one closest to the tip) hits the rear case of the mag. The much larger shoulder is just a red herring put there to confuse you into thinking that it has some function – ignore it. Oh, and if you have an impulse-coupled mag like I do, it's helpful to rotate the mag in the opposite direction from its normal rotation so you don't accidentally get the timing wrong due the impulse coupler engaging while you're fooling with it.
This is the data plate that's attached to the engine. Note that it specifies a spark advance of 25° before top dead center (BTDC). The magneto, however, has a lag angle of 20°, which means that if you time the mag to the engine at 25° BTDC, it will actually fire at 5° BTDC during starting, not right at TDC like you want. Is this a bad thing? I don't know – I read a half-dozen VAF threads on this subject, and none were very conclusive. Like most internet discussions about any subject, opinions ranged from "You'll be killed immediately" to "I've been doing it that way for twenty years and it's fine".
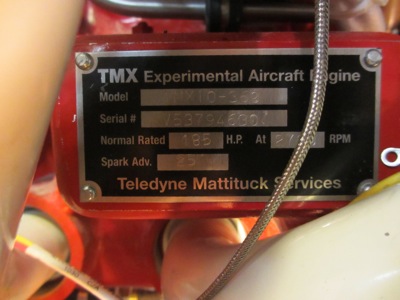
Luckily I don't have to choose for good just yet. I arbitrarily picked a timing of 25° BTDC for use with my 20°-lag-angle-having magneto, on the grounds that that's how it came to me from Mattituck (RIP). And also because I'll re-set and re-check the timing before I actually go to start the engine.
Anyway, what you do is remove all the plugs so the engine can be turned by hand, and rotate the crankshaft in the normal direction (clockwise when viewed from the cockpit) until the #1 cylinder reaches the compression stroke. Keep turning until the desired timing mark lines up with the hole in the starter. If you go past it, rewind several degrees and then come up on it from the normal direction, in order to take up any gear lash in the accessory drive.
Then you install the mag on the engine, with the timing pin still inserted. The exact angle of the mag with relation to the engine isn't critical, although in my case there is only a narrow range of positions where it will actually fit without hitting something else. What you want to do is gently insert the mag into the accessory case and get the gear teeth to line up, then put the nuts on finger-tight. Don't forget the gasket. Also don't rotate the mag or the crankshaft or you'll shear the timing pin. Once everything is in place, remove the timing pin and put it somewhere safe where you'll be sure to forget it later.
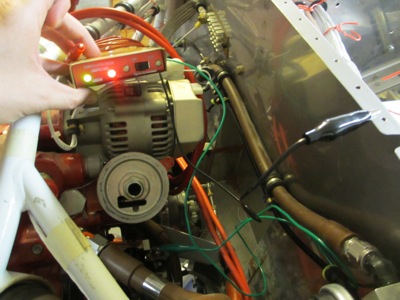
Then you fine-tune the magneto timing, using a magneto timing synchronizer, colloquially known as a "buzz box". Aircraft Spruce sells a wide variety, although they all do the same thing. I have a cheap low-end one that's so cheap it doesn't even buzz, but rather emits a terribly annoying smoke-alarm shriek. I taped over the speaker to mute it a bit. You clip the black lead to ground, the green lead to the P-lead terminal on the left mag, and the red lead to the P-lead terminal on the right mag (not present on my airplane). Then you slowly rotate the mag back and forth until the points are just opening at the desired spot. Tighten the mounting nuts, then rock the crankshaft forwards and back and verify the timing is set how you want it. Repeat annually to check for timing drift due to wear.
The above represents my interpretation of how to install a magneto, based on what I could piece together from web searches, printed material, and consultation with the village elders. Your mileage may vary – consult the instructions that I hope you got with your timing box. This document is also a good starting point.