Author Archive

Installed new fuel pump

Sunday, June 29th, 2008

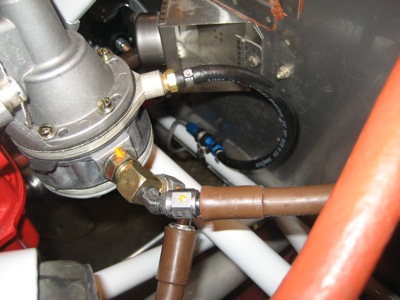
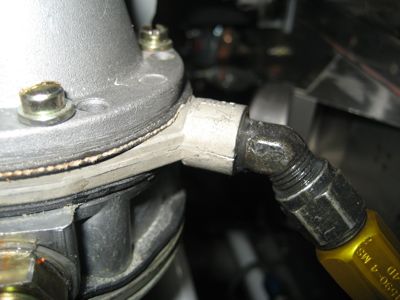
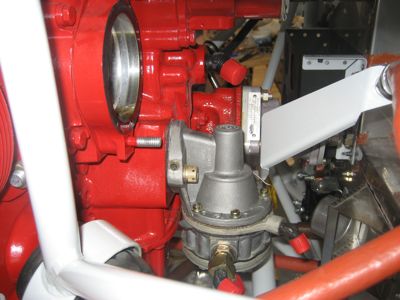
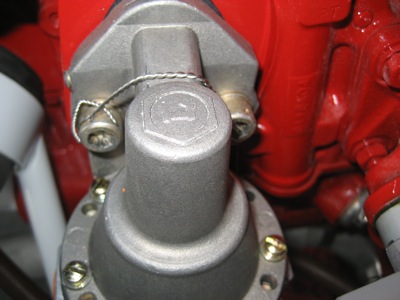
At last, a chance to work on the airplane! Following much finagling, I managed to get the new fuel pump installed on the engine. It's pretty tricky to keep the thing aligned correctly and get the bolts started, while making sure the pump actuator lever isn't hitting the side of the pushrod way up inside the engine that actually drives the thing.

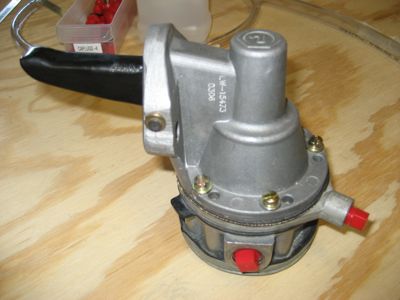
Not really visible here is the new gasket I installed between the pump and the drive pad. I couldn't get a torque wrench on the bolts – actually I could barely get a hex wrench on them with the engine installed on the airplane – so I just torqued them by feel and installed safety wire. It only took me about five tries to get the safety wire installed properly in the narrow space available.

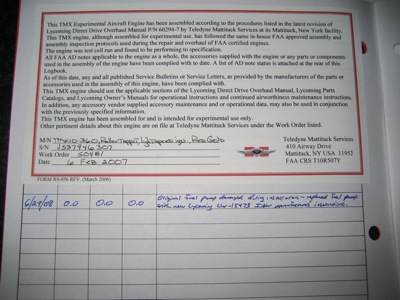
Since replacing the fuel pump seems like kind of a big deal, I decided to make an entry in the engine logbook. It says: 0.0 hours – Original fuel pump damaged during installation – Replaced fuel pump with new Lycoming LW-15473 in accordance with manufacturer's instructions.

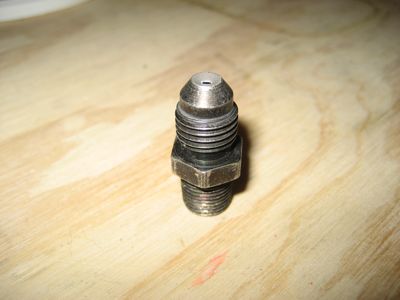
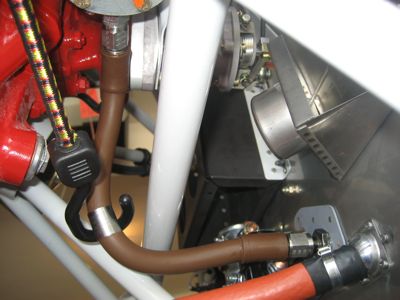
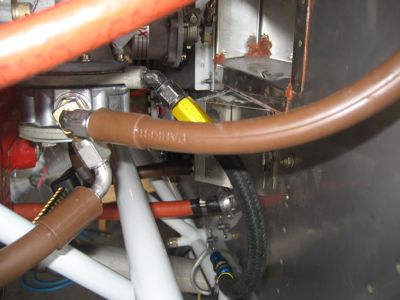
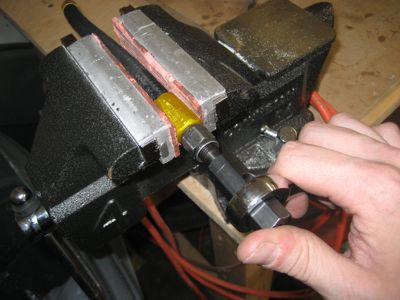
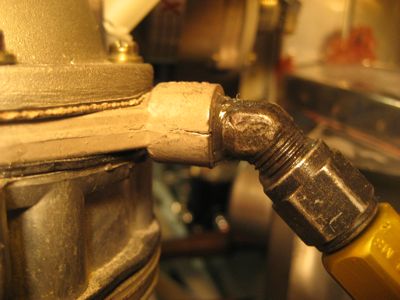
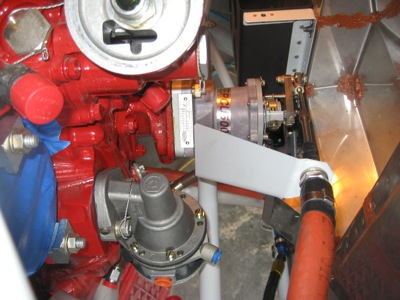
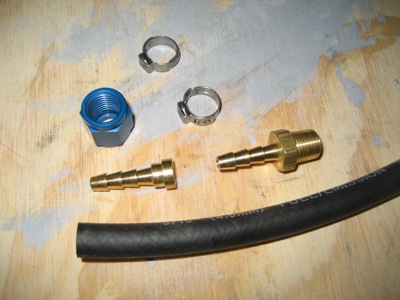
With the fuel pump replacement finally finished, I was now back to where I was a month ago. The next step was to hook up all the hoses, but this time around I didn't want to use a steel fitting for the drain line and risk fracturing the pump again. I decided to use a brass fitting, but I couldn't find one that I could easily substitute for the previous one. Luckily, one of the things I learned when I owned an airplane with a car engine in it – besides the most important lesson, being for goodness sakes, don't ever buy an airplane with a car engine in it – was how to make aircraft and automotive plumbing play together. Here's some 3/16" I.D. automotive rubber fuel hose, a brass hose barb to pipe thread adapter, a brass 3/16" hose to 1/4" AN flare adapter, an AN818-4D flare nut, and some Oetiker stepless hose clamps:

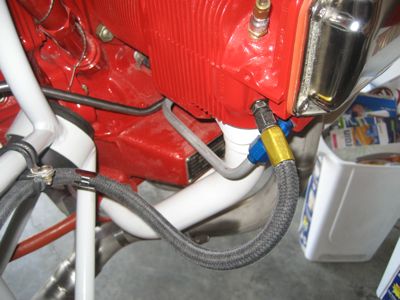
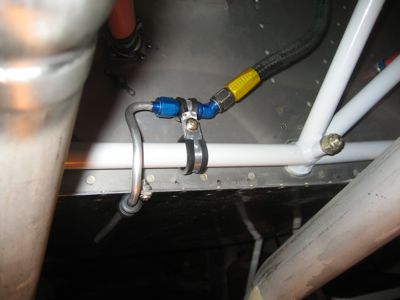
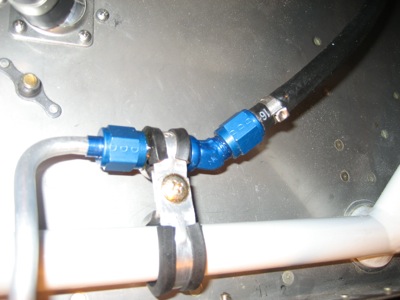
Down at the bottom of the firewall, the rubber hose comes off the suspended plumbing contraption that carries the dumped fuel out the back of the cowling. I really like this method of adapting cheap rubber hose to AN plumbing. Of course, I wouldn't use it for anything other than a vent line, but it's easy to make and I think it looks more professional than the plastic ice maker hose the plans specify for this application. I already had the special tool needed to install Oetiker clamps, so no problem there.

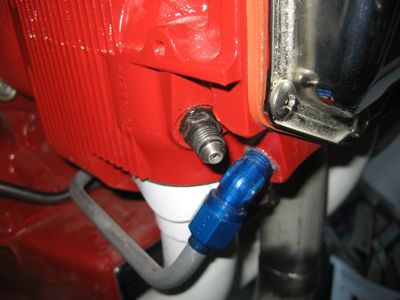
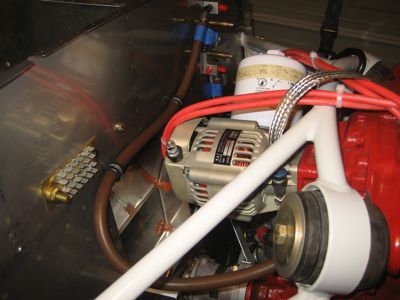
The drain line attaches to the fuel pump via the hose barb fitting, and that's that. I also installed the other three fuel hoses (input, output, and pressure) and torqued all the fittings.

Woodworking

Tuesday, June 10th, 2008

I haven't worked on the airplane in a little while, but I have been keeping busy with other things. For example, we finally broke down and bought a new TV to replace the third-hand 27-incher I bought from a guy at work for fifty bucks many years ago. However, I'm too cheap to pay hundreds of dollars for a simple stand to set the new display on, so I decided to build my own.

Woodworking is not my forte, but I managed to put together a pretty decent looking cabinet out of laminated pine planks and a sheet of birch ply for the back. It took me about three evenings to get all the pieces cut, fitted, and sanded, and then Mary and I spent half a Saturday putting it all together. The top is attached with Miller dowels for a smooth finish.

I've built plenty of workbenches, storage shelves, and sawhorses in my time, but never anything that actually had to look good, so the wood-finishing process was new to me. I was worried that the low-quality pine I used wouldn't take the stain evenly, but after a coat of pre-stain sealer and a coat of oil-based stain, it looked pretty darn good:

I let it dry overnight, and then applied the first coat of clear varnish. Almost immediately I could tell something was wrong… the varnish started moving the stain around! Arrgh. The varnish topcoat went on okay, but it seemed to somehow soften the stain and cause blotchiness. Either the stain wasn't all the way cured, or perhaps the wood really is of such bad quality that the stain didn't really soak in. Oh well – I'll just tell people it's a "distressed" finish. I was pretty distressed when I saw it.

I sanded the first coat of varnish with 400 grit, then put two more coats on over the next couple days. I sanded the final coat with 800 grit crocus cloth for a nice smooth finish. So here's the final product – my old stereo stuff will go underneath, and the cables will pass through the holes in the back:

Overall it turned out pretty good, except I'm pretty disgusted with the finish. The total cost was under a hundred bucks, not including the value of my time. If I had it to do over again, I'd probably make it out of something better than pine – oak, maple, maybe something else? – and be more careful about the staining process. I'll probably also use a semi-gloss topcoat next time, instead of satin.

Well, that's done. We now return to our regularly scheduled airplane building.

Mounted fuse blocks

Thursday, May 29th, 2008

I decided to mount the main and endurance bus fuse blocks on the left side of the subpanel, just behind where the pilot's displays will go. Access to the wiring should be pretty easy after removing one or more glass displays to gain access. Or, I will always be able to go the more uncomfortable route, up from the floor while lying on my back getting poked in the ribs by the fuel selector.

The essential bus diode (with hefty heatsink) is mounted to the other side of the subpanel. I tried to plan its location so that some of the screws used to mount it can also be used to attach adel clamps.

Mary came down to play Bejeweled on her phone and drink wine and watch me work. She composed and photographed this artful scene while I was preoccupied:

Would the isopropyl alcohol in the background count as a dry white? And which do you serve with pneumatic tools, anyway?

Lightspeed ignition mounting

Monday, May 26th, 2008

I mounted the brain box for the Lightspeed ignition system to the starboard subpanel rib. The power and sensor connectors face aft, and the ignition wires exit towards the front, where they have a straight shot through the "noisy" firewall passthrough. (The "quiet" passthrough will be on the other side of the airplane, where all the sensor wires will go)

I used some z-channel material I had laying around, and the box is attached to the channels with screws. The lower bracket is riveted to the avionics shelf, but the upper bracket is attached with screws. I did this to facilitate future maintenance, since I will be able to get to the lower mounting screws from underneath, but the upper ones will be pretty much unreachable from down below… instead, I'll reach in through the forward skin access panel and unscrew the whole bracket from the rib if I need to remove the box for repairs.

Bad day, with hoses

Sunday, May 25th, 2008

Today stated off well but ended poorly…

I wanted to use a restrictor fitting for the connection to the manifold pressure hose, to keep the #3 cylinder from running too lean if the hose breaks. But, Van's only sells a 45-degree restrictor which won't fit on my engine. I had to make my own straight restrictor by filling an AN816 fitting with JB Weld, waiting a day for it to cure, and then drilling a #60 hole through it. Turned out great:

Installed in the port on the #3 cylinder:

The manifold pressure hose attaches to the restrictor fitting, then sort of loops inward:

It's attached to the engine mount with adel clamps, and passes through a fitting I installed in the firewall near the brake fluid reservoir.

The hose that goes between the firewall and the fuel pump inlet is a tight fit, but it works. In this photo I'm using a bungee cord to teach the hose to follow a curve that keeps it away from the engine mount. A couple hours like that and it kept the right shape on its own.

The oil pressure hose exits the right side of the accessory case, loops around to the left, and is secured to the top of the firewall with adel clamps.

The oil pressure hose enters the transducer manifold (top of photo), as does the fuel pressure hose (bottom). Eventually there will be pressure transducers screwed into the manifold, and the unused holes will be plugged.

The fuel pressure hose runs down to a tee on the outlet of the fuel pump (brown hose in center of photo). Also visible in the background is the fuel pump overflow hose, which runs down to the bottom of the firewall.

I have a policy that any hose that carries pressure should be professionally made and tested, but since the fuel pump drain hose doesn't carry any pressure and should rarely even have any fuel in it, I decided to make that one myself. This is Aeroquip 303 hose, using the recommended mandrel for assembly. It's a pain to do properly – I'm glad to leave making the proper hoses to the pros.

Of course, the plans call for the fuel pump overflow hose to be made from plastic tubing, but I thought that was cheesy. My hose is a little heavier but at least it won't melt/crack/etc. The hose runs down to an AN837 fitting that's adel-clamped to the engine mount, and thence a length of aluminum carries the fuel overboard and out the back of the cowling. I drilled out one of the rivets on the firewall flange and used it for a screw and clamp that secures the tubing.

Here's where it all went off the tracks… while installing the very last fitting, the upper one for the fuel pump drain, I accidentally cracked the fuel pump housing:

Another photo with different light. I guess it doesn't take very much torque on a steel fitting to ruin a thin cast-aluminum housing.

After stewing about it for a while, I decided that the fuel pump has to come off to be rebuilt. That meant I had to take off most of the hoses I'd just spent hours installing. I also had to take off the magneto and loosen the prop governor cable bracket just to be able to get at the fuel pump bolts. Nothing on the engine is easy to work on!

After a couple hours of bad language, the fuel pump is now removed from the engine. Hopefully repairing or replacing it won't be too expensive.

I also had to mow the hateful lawn, and the new Indiana Jones movie was not very good, and now I have a headache, so overall this day has been kind of a dud.