Archive for September, 2007

Electrical planning

Sunday, September 30th, 2007

I spent about half the weekend putting what I think are the finishing touches on my electrical system schematics, at least for now, and making a shopping list of components to buy. Tomorrow I'll place the first order with B&C for wire, terminals, fuse blocks, and stuff like that. Luckily I don't have to buy the really expensive stuff (e.g. alternators) just yet.

The latest revision of the drawings is here.

Aux battery II

Sunday, September 30th, 2007

I ordered and received my second aux battery, a Panasonic UP-RW1220P1. This guy is designed for UPS applications, which is basically how I'm going to use it. It's a little larger than the previous one I was messing around with, but the flatter shape of it actually gives me more options for mounting. It also has 1/4" connectors instead of the flimsier 3/16" ones on the other battery, which is a bonus.

This is the battery tray I made for it. It's all made from 1/16" aluminum angle. I actually started out intending to build it out of 1/8" angle, but it became apparent that it was going to be horrendously heavy and overbuilt that way. Since I'm building an airplane, not a Soviet tractor, I scrapped what I'd done and built this one instead. I was peeved at throwing away half a day's work, but the final version turned out pretty nice.

It's mounted beneath the floor on the passenger side of the baggage compartment, in the wedge-shaped bay just outboard of the strobe power supplies. I attached the side angles to the floor ribs with blind rivets, then shot and bucked the round-head rivets that attach the left wall of the tray since there was no way to get a squeezer down in there. First rivets I've shot in approximately forever.

Here's the rest of the pieces installed with screws. Like a ship in a bottle, I had to make it able to be disassembled so I could put it together inside the fuselage and still have good riveting access.

The hold-down bar is another piece of 1/16" angle, with one of the legs cut down to about 1/8" wide to clear the baggage floor above. The bolts are AN3-12A's.

Here's a perspective view showing exactly where in the airplane the aux battery is located. It's getting quite cozy in there under the baggage floor.

If you look at the datasheet linked above, you can see that the battery's terminals are on the side, which made the design of the tray a little more complicated than it should have been. The right-hand wall of the tray has a notch cut out to provide plenty of clearance around the positive battery terminal. The negative terminal has enough room around it to get the FastOn connector over it, and beyond that I don't really care if the ground wire touches the airframe or not.

Support your local imported junky tool store

Saturday, September 29th, 2007

Went to Harbor Freight and picked up another box of rubber gloves and a new air hose, since my last one sprung a leak. Oh well, I got three years or so out of it. I also installed a swivel thingy on the output of the air regulator, to keep the hose from trying to break off the regulator's outlet fitting.

As is usual when I go to Harbor Freight, I couldn't resist buying something cheap that I didn't really need – this time it was a drill press vise for nine bucks. And, as is typical, it's really crudely made. I followed John's advice and replaced the rusty, jagged steel jaws with thin strips of wood, which makes it way more useful for holding aluminum airplane parts.

Aux battery reconsidered

Wednesday, September 26th, 2007

After thinking about my chosen battery location some more, I decided that it involves too many compromises, so I'm not going to use it. I found another battery that actually has more capacity and will fit better, in a different location in the airplane. Stay tuned.

Meanwhile, I updated my electrical system design document – the latest revision is here.

Aux Battery Box

Sunday, September 23rd, 2007

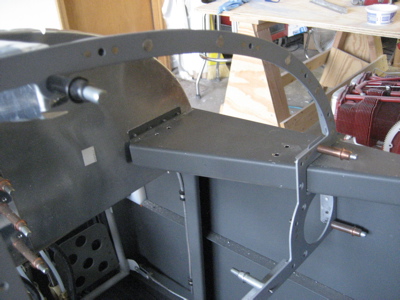
One component that I've designed into the electrical system of my airplane is a small auxilliary battery, which will help keep a few critical systems online during engine start. Unfortunately there aren't a great many places where you can easily mount a second battery. I thought for a while about putting it under the baggage compartment floor or even under the seats, but in the end I decided to choose a small battery and mount it to the F-721A forward canopy deck, behind the panel on the passenger side.

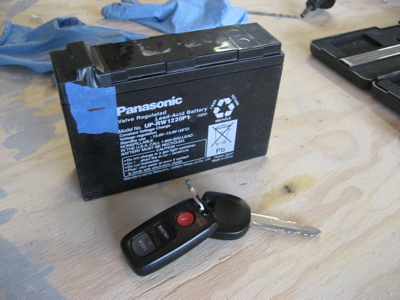
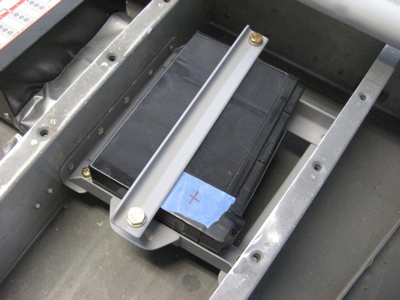
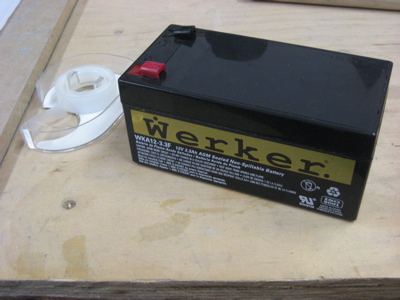
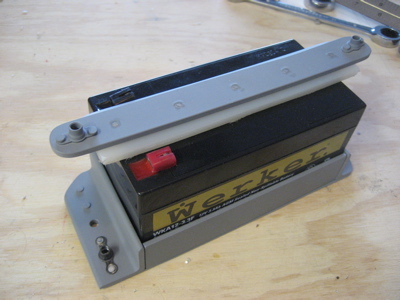
I went to the local battery mega-store and picked up this 3.3 Ah VRLA battery. It is a store-brand clone of a Panasonic LC-R123R4P and is the same size, so I should be able to get replacements in the future if I need to. This is a pretty small battery (note the tape dispenser for reference) but it's the biggest one that will fit between the panel and subpanel.

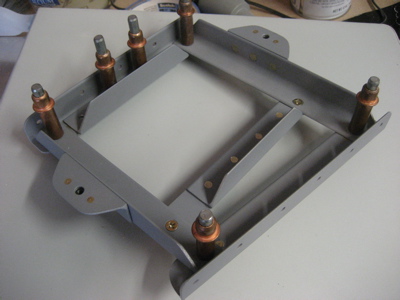
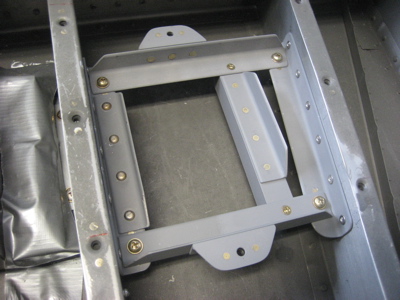
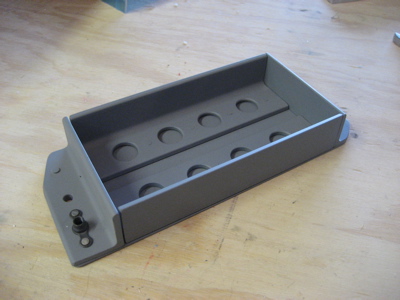
I fabricated some parts out of scrap…

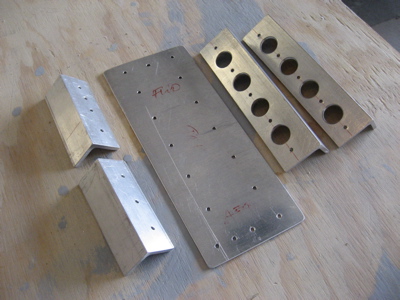
…and made this simple battery box. The base is 0.050" alclad, with 1/8" angles riveted to it (double-flush where necessary). It's probably way overbuilt, but I just used the materials I had on hand. I'm not sure why I primed it – force of habit and superstition, I guess.

Just like the main battery box, this one features a bar to hold down the battery. Unfortunately the battery's terminals are both on top, putting them close enough to the hold-down bar to make me worry about them shorting to it. I worked around this by riveting the bar to a strip of 1/4" nylon that is wider than the bar is, this preventing the bar from being able to contact either terminal. I'm not sure why I had nylon sheet stock in my junk bin, but I'm glad I did.

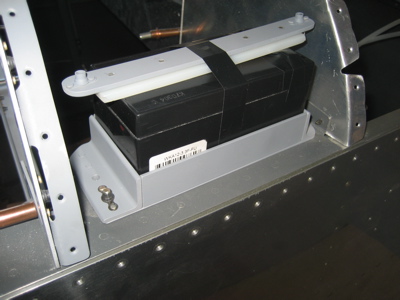
Here's the box bolted in place, with the hold-down bar temporarily taped on until I can pick up some long bolts of the correct size. Note that the bolts all come up from the bottom – this is because the fuselage skin prevents you from lifting the battery straight out of the box. To remove the battery, you actually have to undo all four bolts and slide the whole battery box out first. Hopefully this won't be too much of a hassle, as I don't anticipate needing to replace this guy more often than every few years.

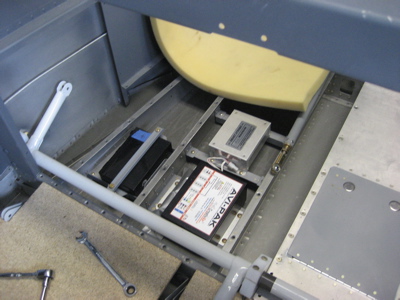
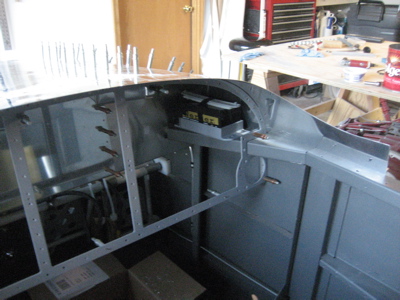
Here's what it looks like with the skin clecoed in place. There is about 1/8" of clearance between the skin and the aft corner of the battery, which explains why I had to let the rear hang off the F-721 a little bit.

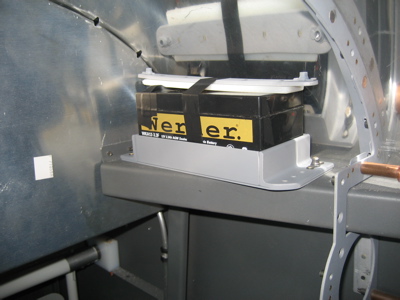
After I took this picture, with the skin still clecoed in place, I unbolted the battery box and removed it just to prove to myself that it can be done. It's actually not a terrible process – I've done worse maintenance on airplanes and lived to tell the tale.

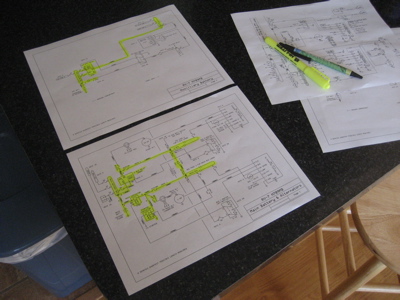
I've also been working on some schematics for the airplane's electrical system. I put together a first draft, along with some notes, and sumbitted it to the Aeroelectric list for review by the learned elders. If you're interested you can cick here to see my current electrical diagrams and some text, including an explanation of how the aux battery will be used.