Archive for July, 2007

Forward canopy trim strip

Sunday, July 15th, 2007

The plans tell you to attach the canopy directly to the forward bow of the frame with pop rivets, with no aluminum in between the fasteners and the plexiglass. This is the only place on the canopy where they show rivet heads bearing directly on the plexiglass, and it makes me worry to think about what will happen to those fastener holes when the glass starts to expand and contract with changing temperature. I decided I wanted to have the plexiglass securely sandwiched beneath an outer layer of aluminum everywhere it's fastened to the frame, in order to better spread the load and allow for thermal expansion. For lack of a better term I'll call this piece the forward canopy trim strip.

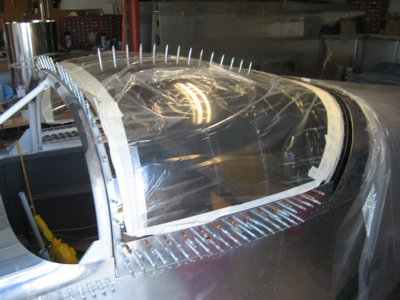
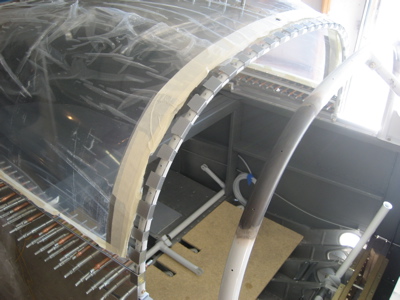
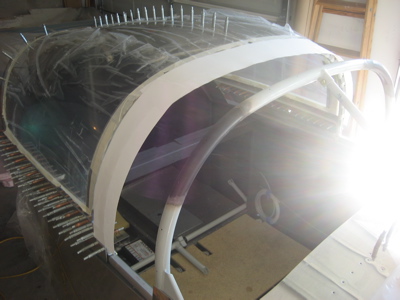
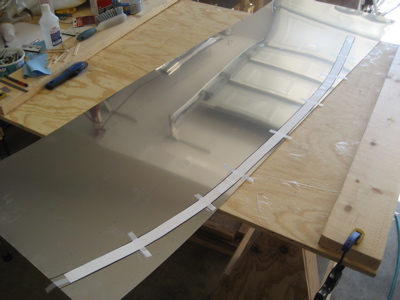
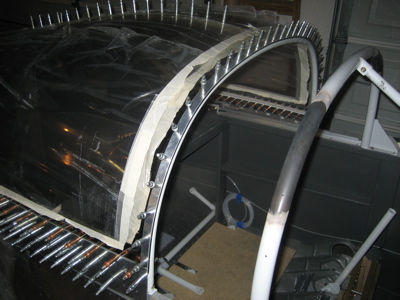
First I taped the canopy to the forward bow, so it would maintain the correct shape without clecoes:

Then I taped down a strip of posterboard so I could trace the outline of a template. (Side note: Notice how bright it is in these photos? That's what it's always like in my east-facing garage in the morning. It gets hot early, and the reflections from aluminum airplane parts are often intense.)

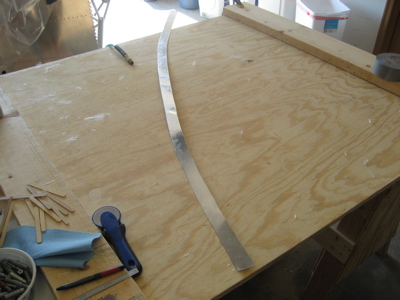
I cut out the paper template and taped it to a six-foot section of 0.032" I bought from Airparts last week.

After a few minutes of using snips, I had a rough and oversized blank cut out.

I clamped it to the canopy to test the fit…

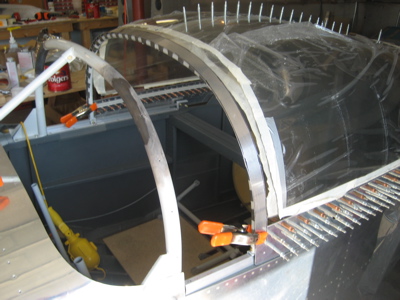
…then drilled the rivet holes using the same technique I used to drill the ill-conceived metal aft skirts.

I scribed a line on the bottom of the aluminum hanging over the forward edge of plexiglass, then cut and filed the strip to just beyond the scribe line. That gave me an attractive front edge that was nice and flush with no metal sticking out to cut/pinch your fingers. Then once I had the front edge the way I wanted it, I marked the trimmed the aft edge to give the strip a uniform width across its entire length.

Right now I have the ends of the strip tucked underneath the canopy side skirts. There is a small ear on the lower end of the strip that picks up the forwardmost skirt-to-frame rivet (the lower silver cleco in this photo). I may also need to shim under the forwardmost screw hole (copper cleco) or otherwise put a bend in the front corner of the skirt to keep it from bowing out.

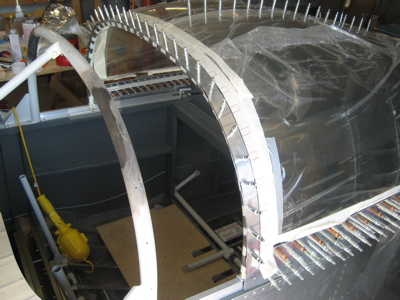
Here's the finished product, ready for final drilling and dimpling. When the canopy is closed, this will be hidden under the fairing that goes over the top of the rollbar, so you'll only be able to see it when the canopy is open.

Ahh, nothing like scratch-building something out of metal to get the airplane-building spirits back up.

Fiberglass canopy skirts part III

Saturday, July 14th, 2007

After six hours in the July heat, the layups I did this morning were cured. To my great relief, I was able to pop the fiberglass skirt off the fuselage without any trouble.

Below is a picture of the result. The ragged edges are expected and normal, but note how flexible the thing is and how pronounced the previously mentioned ripples are – not good. I obviously didn't make it thick enough. In fact the only part of it that's sufficiently rigid is the area at the top where it's six plies thick instead of only three.

I could put it back on and lay up more glass over the top of it, but I'm not happy with the shape either. So, into the trash it goes:

After removing all the tape, the canopy is back to its previous state with no harm done. That's one nice thing about fiberglass, I guess – it gives you lots of chances to get it right if you care to put in the effort.

I decided that it was dumb to have these 1/8" spacers under the rear anchor blocks while trying to mold a fiberglass canopy skirt on the fuselage. It makes sense to have them there to add some extra preload when bending up metal skirts, but with fiberglass the end product is exactly the shape that you molded it to be – if you mold it with the canopy not in its normal position, it won't fit when you take the spacers away. So, I removed the spacers and will mold the next attempt a fiberglass aft skirt with the canopy latched in its proper position. That will reduce the amount of "ski jump" effect, at the very least.

To reduce the ripple effect, I'm planning to use stronger tape – maybe duct tape for a base with packing tape on top to act as a parting surface – and do a better job of stretching it taut when sticking it down. In fact I may block the canopy open a tiny bit, put down the tape, and then latch it shut – thus tightening the tape like a drum. A straighter surface will mean less filler and less weight.

Finally, I'll use four or five plies of 9-oz cloth everywhere. That should make it strong enough. Of course since I'm almost out of cloth I'll have to wait till my next Aircraft Spruce order comes in.

Summary of today's work: A lot of glue and fury, signifying nothing. But I learned what it will take to do the job right on the second try.

Fiberglass canopy skirts part II

Saturday, July 14th, 2007

Here's a shot of the supplies I use when doing layups: Aluminum foil for keeping goop off the worktable, West Systems epoxy resin and hardener, bid cloth of a couple different weights, chunks of foam rubber and cheap bristle brushes for wetting out the cloth, an old credit card for pressing out excess epoxy, peel-ply, fabric cutter, scissors, non-waxed mixing cups, popsicle sticks, and gloves.

This is what you see when you open a new can of West Systems epoxy hardener. See, you can't say that they didn't warn you to turn back.

I didn't take any pictures of the laying-up process, since I was working solo with messy hands and the epoxy clock was ticking. This photo was taken right after I finished putting down all the layers of glass, while I was changing gloves.

I usually like to wet out the glass on a piece of aluminum foil or wax paper and then lay the wet cloth onto the work piece, but the canopy skirt is way too big to do anything but lay it up directly on the fuselage. Basically, I painted epoxy directly onto the skirt area, then laid down a piece of 6-oz cloth on one side of the fuselage. With the brush, I stippled the cloth with epoxy until it was wetted out, and smoothed out all the wrinkles and air bubbles. Then I did the same thing on the other side, followed by four more pieces of 9-oz cloth, for a total of three plies on each side. After laying down each new piece of cloth, I wetted it out with the brush and worked out the bubbles. The cloth becomes translucent when it's saturated with epoxy, so you just keep pressing epoxy into the cloth until it changes color. Using too much epoxy just makes puddles on top of the cloth that are hard to sand off and don't contribute to strength, so the excess gets the squeegee treatment.

At the centerline, I taped over the C-679 canopy track seal and laid the glass directly on top of it. That should make it seal up pretty well. Because of the overlap, the center section is six plies thick.

You can also see some ripples in the glass between the fuselage skin and the plexiglass. These are not bubbles – the tape itself is a little bit wavy where it spans the gap between canopy and fuselage, so the fiberglass is dutifully following the wavy shape of the mold. I'm already committed to slathering filler over the entire thing to smooth out the "ski jump" contour created by the height mismatch between the canopy and fuselage skin, so I guess I will put down more filler to get rid of the ripples.

I laid peel-ply over the skirts and wetted it out just like another layer of glass cloth. This helps fill the weave of the cloth with epoxy, and gives you a better surface for sanding afterwards. Once the epoxy is cured, the peel-ply will be removed using approximately the same technique as is used for the final step of a bikini wax job.

Here's a perspective shot to remind myself that the end goal here is indeed to have a flying airplane. I've been working on the canopy for so long that lately I've been unable to think of this project as anything other than a never-ending series of canopy-related chores.

I've even caught myself looking through Kitplanes and thinking, "You know, it would be super awesome to build an airplane someday. Oh wait…"

Fiberglass canopy skirts part I

Thursday, July 12th, 2007

I spent several days fooling around trying to form a good set of aft canopy skirts out of aluminum, and finally gave up. So now I'll try making a set out of fiberglass. To keep glue off the fuselage and canopy, I taped down plastic sheeting everywhere except the aft skirt area.

I strung packing tape between the canopy and top fuselage skin. This will become the mold on which I'll lay up the fiberglass, thus hopefully making the new skirts fit the canopy nicely. Before I put the tape down, I sketched a line on the fuselage skin to give me something to aim at when laying up glass.

Clear things are hard to take pictures of. Here's another photo:

I cut out some pieces of 9- and 6-ounce bid cloth, using the metal canopy skirt pieces as a rough guide.

When I get a block of time I'll break out the epoxy and do a big huge layup.

Canopy lock

Sunday, July 8th, 2007

I spent most of the weekend sweating profusely in the sweltering garage, trying to figure out a way to install a lock on the canopy. To keep unwanted visitors out of the airplane, I wanted a to use a small key lock that was simple, easily-obtainable, and reasonably secure. I have no illusions that I'll be able to keep a determined thief from getting into the airplane, but at least the presence of a simple lock on the canopy ought to help keep honest people honest when the plane is parked outside and unattended.

After examining various options available at the local hardware emporium, I picked the same chrome plated cabinet lock that's been used by other builders. For future reference (in case I have to replace it) the manufacturer is Prime Line and the model is U-9941.

Since the canopy skirts are only 0.032", I made this doubler for the lock out of the remains of a spare elevator rib I had laying around.

The doubler will be riveted to the side skirt in two places. The odd shape is to let it clear the C-791 skirt brace. You may notice that although the lock body has anti-rotation flats machined in it, I didn't bother to try making the odd-shaped hole required to make use of them. I found that in practice the nut alone is enough to keep the lock from rotating once it's tightened down. This probably means that you could pop the lock open with a big enough flat-bladed screwdriver, but then again I'm only doing this to keep kids out at airshows.

The flange on the doubler will also be pop-riveted to the underside of the canopy frame.

I trimmed away some of the C-791 skirt brace around the lock and doubler. It's tight but it all fits together.

Careful measuring beforehand ensured that there would be just enough room to get a 7/8" socket onto the nut. I want to be able to remove and replace the entire thing down the road, in case it gets rusty or I twist off the key.

Here's a view from the exterior side. I wish I could have found a more flush-fitting lock, but this one will probably not cost me more than 0.01 knots.

In the unlocked position, this latch arm will be parallel to the canopy track and generally out of the way.

In the locked position, the latch arm will be vertical and will fit into a small slot that I'll cut in the canopy track. I'll wait to cut the slot until after the canopy is completely assembled and fitted, since the spacers underneath the rear anchor blocks are distorting the canopy geometry at the moment.

It's crazy that I spent an entire afternoon working on this. Little custom side projects like consume a lot of build time.