Archive for February, 2008

Rivet insanity

Wednesday, February 27th, 2008

Sometimes Van's sends me a bag that contains two different sizes of rivets, which I then have to painstakingly separate so I can put them into the right storage drawers. This time the two rivet sizes were only 1/16" apart, which made it an even more eye-crossingly tedious chore.

I think they do this to me just so I won't get cocky.

Bolting stuff to the engine

Sunday, February 17th, 2008

This is the Precision Airmotive RSA-5 fuel injection servo. I need to get this guy bolted onto the airplane, but it didn't come with any instructions – so I don't know, for example, if I need a gasket between the servo and the oil sump, or what. I sent an email to Mattituck.

Van's makes a pretty well-done little kit that contains a bellcrank for connecting the mixture cable to the fuel servo, and a series of little brackets for anchoring the control cables to the engine. I removed two of the case bolts and attached the bellcrank bracket to the oil sump, like so:

The mixture cable bracket attaches via another pair of case studs, underneath the #4 cylinder. These nuts all have lockwashers under them.

The throttle cable bracket bolts to a threaded boss on the bottom of the oil sump. I safety-wired the bolt heads:

Those coarse-thread bolts didn't come drilled, so I had to use my handy bolt-head-drilling jig to do it myself:

Here we go, two drilled-head, coarse-thread bolts:

I attached the engine-driven fuel pump's inlet fitting:

…and the outlet fitting, with restrictor fitting to feed the fuel pressure transducer:

Han Solo frozen in chocolate

Saturday, February 16th, 2008

And now, a small diversion from airplane building. Do you remember how Han Solo was frozen in carbonite at the end of The Empire Strikes Back? I mean, who doesn't, right? Now, at this point I'm sure you're probably thinking: Star Wars! It is so awesome, I wish I could eat it! Well, you need wait no longer, because I am about to show you how to make chocolate Han Solos.

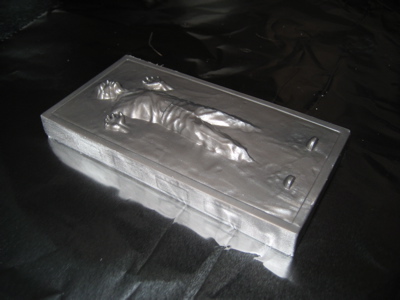
In exchange for first dibs on the finished product, Nick provided a frozen-Han action figure. I felt momentarily bad about opening the still-sealed packaging, but there's science to be done!

I used my belt sander to take off the protrusions around the edges, and sanded the sides down to 400 grit. Some people who are even bigger nerds than me have documented the function of the bits I removed – I hope Han does okay without a functioning carbonite flux monitor.

While I prepared to start making the molds, Mary gave Han a bath and toweled him off.

I used two pounds of silicone plastique, a two-part, food-grade moldmaking compound.

When mixed, the silicone has the approximate consistency of silly putty, but is demonstrably less silly. Mixing is done by hand.

I formed the silicone into a brick shape, and pressed Han face-down into it.

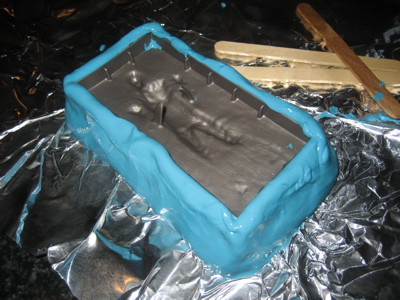
After letting the silicone cure for several hours, I carefully popped him free, and was left with a nearly perfect Han Solo mold. Success! With the remaining silicone, I then made a second mold using a similar process.

To melt the chocolate chips, we placed them in a metal bowl suspended over a pot of hot water, as recommended by the confectionery experts.

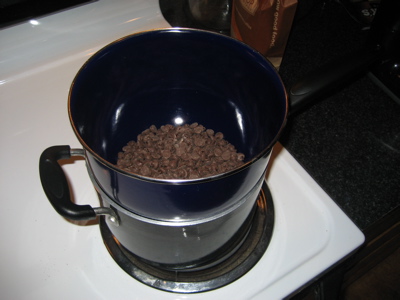
The melting process must be done slowly, lest the chocolate be singed by excessive heat. Patience!

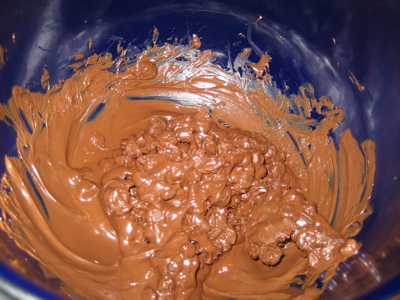
After liquefying the chocolate, we carefully spooned it into the molds and placed them in the freezer to cool.

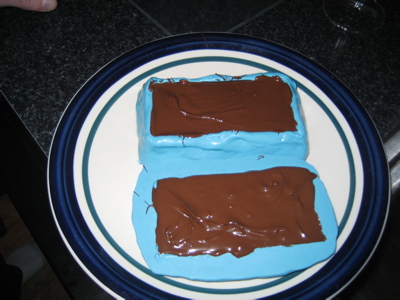
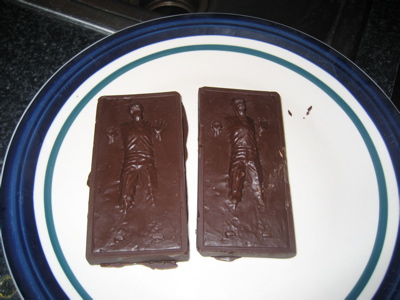
After a half hour, the chocolate was well and truly solid again. I pried the finished products from the molds, and we were rewarded with a pair of Chocohans! One of them seems to be missing his face, but there's no use crying over every mistake.

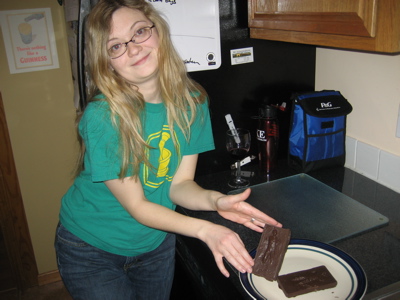
Mary doing her Barker's Beauties impression with a lucky Han Solo:

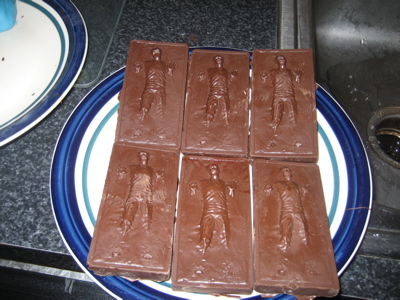
We kept on going until we ran out of chocolate – two pounds of chips was enough to do six Chocohans. Once we refined our technique, we decided to get crazy and make a pair of Crunchy Chocohans by adding Rice Krispies after pouring the chocolate.

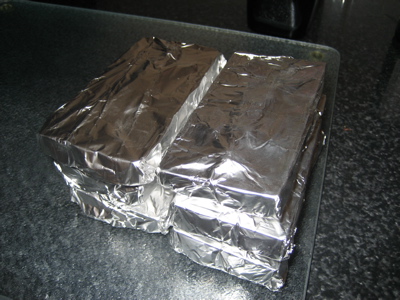
I wrapped the Chocohans in aluminum foil and took them to work, where they were a huge success.

Disclaimer: While I do claim to have come up with this idea independently, the historical record will show that at least one intrepid culinary artist had already beat me to it. Still, this was a triumph! It's hard to overstate my satisfaction.

Hung the engine

Sunday, February 10th, 2008

With the engine suspended from the hoist, we unbolted and removed the pallet, leaving the engine swinging:

Matthew Brandes and his foreign-exchange student Nat came up to help put the engine on. Matthew has already been through this exercise on his RV-9A, so he is an old hand. We maneuvered the engine into place and managed to get the first three bolts in without much trouble, but the last one was kind of a goat-rope.

Chad was there to help too. Maybe he'll get started on his own RV soon…?

Finally, all four bolts went in. We unhooked the hoist and lowered the tail down before final-tightening the nuts.

I was able to get all four cotter pins put in, and considering that there's almost no access to install them, I'm happy with how they turned out.

The fuselage is on the wheels with the engine installed. Awesome.

The prop governor oil line comes pretty close to the engine mount. I'll have to keep an eye on this.

The oil filter looks like it's trapped forever, but there's just enough room to remove and reinstall it.

It took about an hour and a half for us to get the engine bolted to the mount, and another hour or so for me to get the bolts tightened, install the cotter pins, and clean up. All in all, much less work than I thought it would be. Thanks to Matthew, Nat, and Chad for the help.

Preparing to attach engine

Saturday, February 9th, 2008

Per the plans, I'm using Permatex #2 sealant on all threaded plumbing that attaches to the engine:

I had to remove the oil filter to install the fitting for the oil cooler return line:

With the filter back on, there appears to be plenty of clearance to get a hose onto this fitting without hitting the filter or magneto. The plans say to use a straight fitting here, but a 45-degree fitting is really necessary if you have an angled oil filter adapter like I do.

A crow's foot wrench came in handy for tightening the fitting for the other oil cooler line. A 45-degree fitting is necessary here too, as others have discovered.

Looking from the left side of the engine, you can see how the hose will go between the prop governor bracket and the engine-driven fuel pump. I may also have to use a hose with a 45-degree fitting on the end – we'll see.

Looking into the business end of a VA-128 restrictor fitting. The end is plugged with a brass (?) insert that has a small passage drilled through it. Using these for the oil and fuel pressure pickups is a smart idea, so that a broken transducer hose won't dump all your oil overboard or pump fuel onto the hot exhaust pipes.

The oil pressure fitting has to be clocked at a 45-degree angle to vertical, so the hose goes the right way and doesn't hit the engine mount. Notice I had to remove one of the clips that attaches the right magneto drive pad cover plate, in order to get a wrench on the fitting.

I propped up the tail with a sawhorse padded with foam rubber. The tailwheel spring is secured to the sawhorse with a bungee cord so it doesn't accidentally get knocked off.

Now the fuselage is roughly level, which will make hanging the engine easier.

I manhandled the engine pallet up onto dollies, and rolled it over towards the front of the fuselage:

Then I levered the whole works up onto the feet of the engine hoist. I'll unbolt and discard the pallet once my helper arrives tomorrow.

Heavy red thing is ready to attach to white thing.